Documentation
Modules
Project Documentation

This release of the PDS4 System represents Build 9b and is intended as an operational release of the system components to date. The following sections can be found in this document:
This section details the controlling and applicable documents referenced for this release. The controlling documents are as follows:
This section details the new, modified and corrected capabilities that comprise this release. They are summarized here for a system-level view. A more detailed list of capabilities can be found in the change logs for each component.
The following are new capabilities for this release:
The following capabilities have been modified for this release:
The following capabilities have been corrected for this release:
This section details the liens against the capabilities that have yet to be implemented or are partially implemented. They are summarized here for a system-level view. A more detailed list of liens can be found in the release notes for each component.
This section details the system requirements for installing and operating the software. Specific system requirements for each component in this release can be found in their respective Installation documents.
The custom software contained in this release was developed using Java and will run on any platform with a supported Java Runtime Environment (JRE). The software was specifically compiled for and tested with Java version 1.8. The following commands test the local Java installation in a UNIX-based environment:
% which java
/usr/bin/java

% java -version
java version "1.8.0_101"
Java(TM) SE Runtime Environment (build 1.8.0_101-b13)
Java HotSpot(TM) 64-Bit Server VM (build 25.101-b13, mixed mode)
The first command above checks whether the java executable is in the environment's path and the second command reports the version. If Java is not installed or the version is not at least 1.8, Java will need to be downloaded and installed in the current environment. Consult the local system administrator for installation of this software. For the do-it-yourself crowd, the Java software can be downloaded from the Oracle Java Download page. The suggested software package is the Java Standard Edition (SE) 8, either the JDK or the JRE package. The JDK package is not necessary to run the software but could be useful if development and compilation of Java software will also occur in the current environment.
The other main system requirement pertains to providing a Java application server for hosting certain components (e.g., Registry Service, Search Service, etc.). The suggested application server for this release is Apache Tomcat with a minimal version of 7.0.X. Version 8.5.X is also supported in this release. Consult the local system administrator for installation of this software. For the do-it-yourself crowd, see the Tomcat Deployment document for installation and configuration details.
The installation of a web server to act as a front-end interface to the Java application server is desired. The suggested web server for this release is the Apache HTTP Server. Consult the local system administrator for installation of this software. For the do-it-yourself crowd, the Apache HTTP Server software can be downloaded from the Apache HTTP Server page.
The installation of a database server is suggested to support the deployment of the Registry Service. The Registry Service comes prepackaged with the Apache Derby database but isn't necessarily the preferred choice for an operational deployment. Other options supported by the Registry Service include MySQL and PostgreSQL. Consult the local system administrator for installation of these database servers. For the do-it-yourself crowd, the MySQL software can be downloaded from the MySQL page while the PostgreSQL software can be downloaded from the PostgresSQL page.
If another database server is preferred, contact the EN so we can help prepare a database-specific configuration for your environment.
This section details the installation and operation of the software in this release. This release is intended for deployment in the Engineering Node operations environment with certain components deployed in the environments of participating Nodes. Details regarding the release for each of these components, including installation of the packages and operation of the associated software, can be found in the documentation for each component. This release is comprised of the following components:
Not all of the above components are required for a given installation of the software for this release. The following sections detail typical deployment scenarios for the Engineering Node and the Discipline Nodes, respectively.
This section provides an overview of the deployment to the Engineering Node operations environment. The following diagram depicts the EN system flow, starting with central catalog migration, data product registration and finishing up with search index generation:
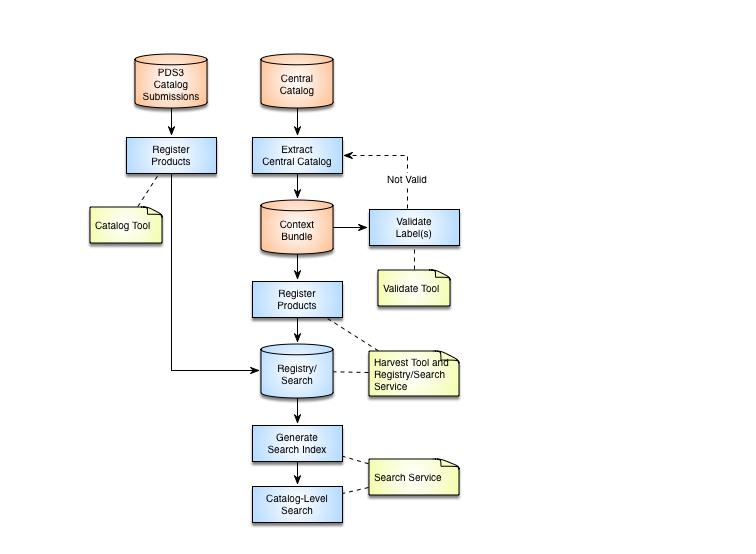
The components depicted above serve as the operational deployment of this release for the Engineering Node. The main purpose of this deployment is to support catalog-level search for the PDS.
The Catalog Tool provides the means for registering PDS3 catalog files with the Registry Service. This tool provides functionality for comparing, validating and ingesting a catalog submission.
The Harvest Tool provides the means for registering products with the Registry/Search Service. This tool reads a PDS4 product label, extracts specified metadata and registers the product with the Search Service at the registry index. This tool allows the user to register a batch of products and generates a summary report.
The Search Service provides functionality for accepting queries from data consumers for registered products and includes functionality for retrieving search results. As of build 9b, this Registry Service has been integrated with this component. The end point for this service is https://pds.nasa.gov/services/search/.
The Search User Interface software serves as the user interface for the Search Service on the PDS website. The end point for this application is https://pds.nasa.gov/tools/data-search/.
The Report Service provides the capability for capturing and reporting metrics. With this release, the service supports generation of monthly metrics for each of the Nodes.
This section details the deployment to a Discipline Node environment. The Nodes are asked to download, install and exercise the software that makes up this release. The following diagram details an example deployment of selected components:

The components depicted above represent a typical deployment of the PDS4 software on a single server. The following diagram depicts a normalized system flow, starting with schema design, continuing onto data product label generation and validation and finishing up with data product registration and search index generation:
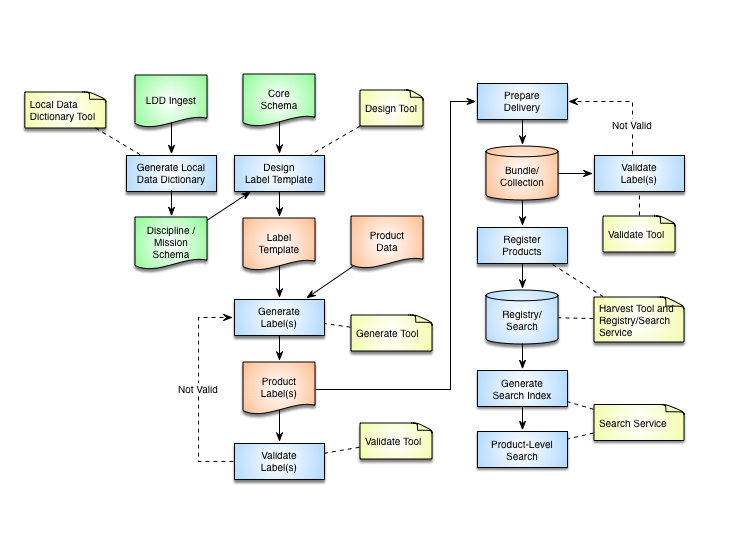
This diagram identifies where the system components come into play within the system flow. These components and the ones depicted in the deployment diagram, are described in more detail with respect to how the components can be utilized in operations:
The Generate Tool is intended to aid users in the generation of their data product labels. This tool was developed by the Imaging Node at JPL and provides a command-line interface for generating PDS4 Labels from either a PDS3 Label or a PDS-specific DOM object.
The Validate Tool comes pre-packaged with the latest version of the core XML Schema and Schematron files generated from the data model. The tool allows the user to validate collections of products or single products against the associated core schema. Discipline and mission schemas can be passed into the tool to enable a more detailed validation check. Although the Design Tools listed above provide a file-by-file validation capability, this tool allows the user to validate a batch of products and generates a summary report.
The Transform Tool and the PDS4 Tools library provide product transformation capability. The Transform Tool provides a command-line interface to a subset of the functions offered by the PDS4 Tools library. In addition, the PDS4 Tools library provides functionality for accessing PDS4 data objects. The functionality of both of these components will be expanded in future releases.
The Harvest Tool provides the means for registering products with the Registry Service. This tool reads a PDS4 product label, extracts specified metadata and registers the product with the registry. This tool allows the user to register a batch of products and generates a summary report. This tool also supports registration of PDS3 data sets for the purpose of tracking and reporting.
The Search Service provides functionality for accepting queries from data consumers for registered products and includes functionality for retrieving search results. This component acts as the interface to the Registry Service for the data consumer.
The Online File Specification Name (OFSN) Transport Service provides functionality for transporting and transforming PDS products. This service offers a similar interface to the PDS-D Product Server and allows a user to interface with an archive directory structure for discovering and retrieving product files.
The Registry Transport Service provides functionality for transporting and transforming PDS products. This service interfaces with the Registry Service or Search Service to discover and retrieve products files given a logical identifier.
Installation Procedures for Core Components
Although the Design, Generate and Transform Tools are included with this release, we have not included them in the installation procedure because they may not pertain to every Discipline Node. This procedure will focus on installing the Registry components, Harvest Tool and Validate Tool. The example commands below assume the software is installed in the user's home directory, indicated by the $HOME environment variable. If this is not the case or if this variable is not defined, the absolute path should be used instead of the variable. Some of the commands below have been broken into multiple lines for readability. The commands should be reassembled into a single line prior to execution. Perform the following steps to download, install, configure and test the software in the Node's local environment:
As specified in the System Requirements section above, the software requires Java, a Java Application Server (Apache Tomcat), a Web Server (Apache HTTP) and an optional database server to be installed and accessible. These installations should be verified before proceeding to the next step.
With respect to the Web Server installation, this server may reside on another server and in most cases that would be preferable. The preferred configuration is to install the PDS4 software components on a server that resides behind a firewall at your institution. This offers an initial level of security for the components. Configuring the Web Server for reverse proxies to the query interfaces of the components provides an additional level of security by restricting access to the interfaces that allow updates to the data.
The Installation document for the Harvest Tool provides the details for downloading and installing the software.
The Installation document for the Validate Tool provides the details for downloading and installing the software.
Installation Procedures for Search Service
The Installation document for the Search Service provides the details for downloading, installing and configuring the software. The reverse proxy configuration that follows provides security for the Search Service instance. The instance of the service is accessed at /services/search on the web server which is facilitated by the following reverse proxy configuration in the Apache HTTP Server httpd.conf file:
ProxyPass /services/search/ http://localhost:8983/solr/
ProxyPassReverse /services/search/ http://localhost:8983/solr/
ProxyPass /services/search http://localhost:8983/solr
ProxyPassReverse /services/search http://localhost:8983/solr

<Location /services/search/admin>
Order Deny,Allow
Deny from all
Allow from 137.78.0.0/255.255.0.0 137.79.0.0/255.255.0.0 .jpl.nasa.gov
</Location>
The last portion of the configuration above limits access to the Apache Solr Admin interface to folks outside of the institution. The values in the Allow from... line need to be modified for your local network.
The above steps exercise the core components of the system but are not exhaustive by any measure with respect to testing the software, but they will verify that the software can be installed and executed in the various Node environments. Some Nodes are actively working on generating PDS4 bundles and collections. If a Node would like to attempt to register those products with their local registry the EN would be glad to assist in this effort. In addition, the Harvest Tool supports registering a PDS3 Data Set with the Registry Service. An example configuration file (harvest-policy-pds3.xml) for registering PDS3 Data Sets can be found in the harvest-conf/examples directory of the Harvest Tool distribution package. When registering a PDS3 Data Set, the Harvest Tool creates an in-memory proxy label for each product and registers it with the Registry Service. Although not sufficient for PDS4 migration, it does provide a tracking mechanism for PDS3 Data Sets until they can be migrated to PDS4.
Installation Verification for Core Components
Now that the core software is installed, it can be exercised with a local bundle prepared by the Node or with the Example Bundle available from the EN. The following steps detail exercising of the software with the Example Bundle:
The bundle can be downloaded from the PDS Web Site. Unzipping the package results in a directory named V1900. The sub-directory dph_example_archive contains the example bundle.
The next step exercises the Validate Tool by validating the Example Bundle. The Operation document for the Validate Tool provides the details for executing the software. Execute the Validate Tool against the Example Bundle with the following commands:
% cd $HOME/validate-1.15.0/bin
% ./validate -f -t $HOME/V1900/dph_example_archive
The above run results in a known single error:
...
Summary:

  1 error(s)
  0 warning(s)

End of Report
Note that the -f flag was passed on the command-line to force the tool to use the web-accessible XML Schema and Schematron files specified in the label.
The next step exercises the Harvest Tool and Registry/Search Service by registering the contents of the Example Bundle. The Operation document for the Harvest Tool provides the details for executing the software. A configuration file (harvest-policy-example.xml) for registering the Example Bundle can be found in the harvest-conf/examples directory of the Harvest Tool distribution package. Depending on the location of the Example Bundle in the local environment, the file and path specifications in the configuration file will likely need to be updated for the Example Bundle location in the local environment. Execute the Harvest Tool against the Example Bundle with the following commands:
% cd $HOME/harvest-2.0.0/bin
% ./harvest -c ../harvest-conf/examples/harvest-policy-example.xml -C ../search-conf/defaults
The above run will result in no errors and no warnings. The summary should look something like the following:
...
Summary:

16 of 16 file(s) processed, 1 other file(s) skipped
0 error(s), 0 warning(s)

Product Labels:
16         Successfully registered
0          Failed to register

Search Service Solr Documents:
16         Successfully created
0          Failed to get created

Product Types Handled:
4 Product_Collection
5 Product_Observational
6 Product_Document
1 Product_Bundle

0 of 0 generated checksums matched the supplied value in their product label, 33 value(s) not checked.


End of Log
The next step verifies that the product labels processed from the previous step were ingested successfully. This can be checked using the Solr Admin Interface. It should be accessible via the following URL: http://localhost:8983/solr/. The product labels get stored as label blobs in Solr under the .system Solr collection (which is aliased to registry). Use your favorite web browser to access the Solr Admin interface. Once there, do the following:
You should see something similar to the following:
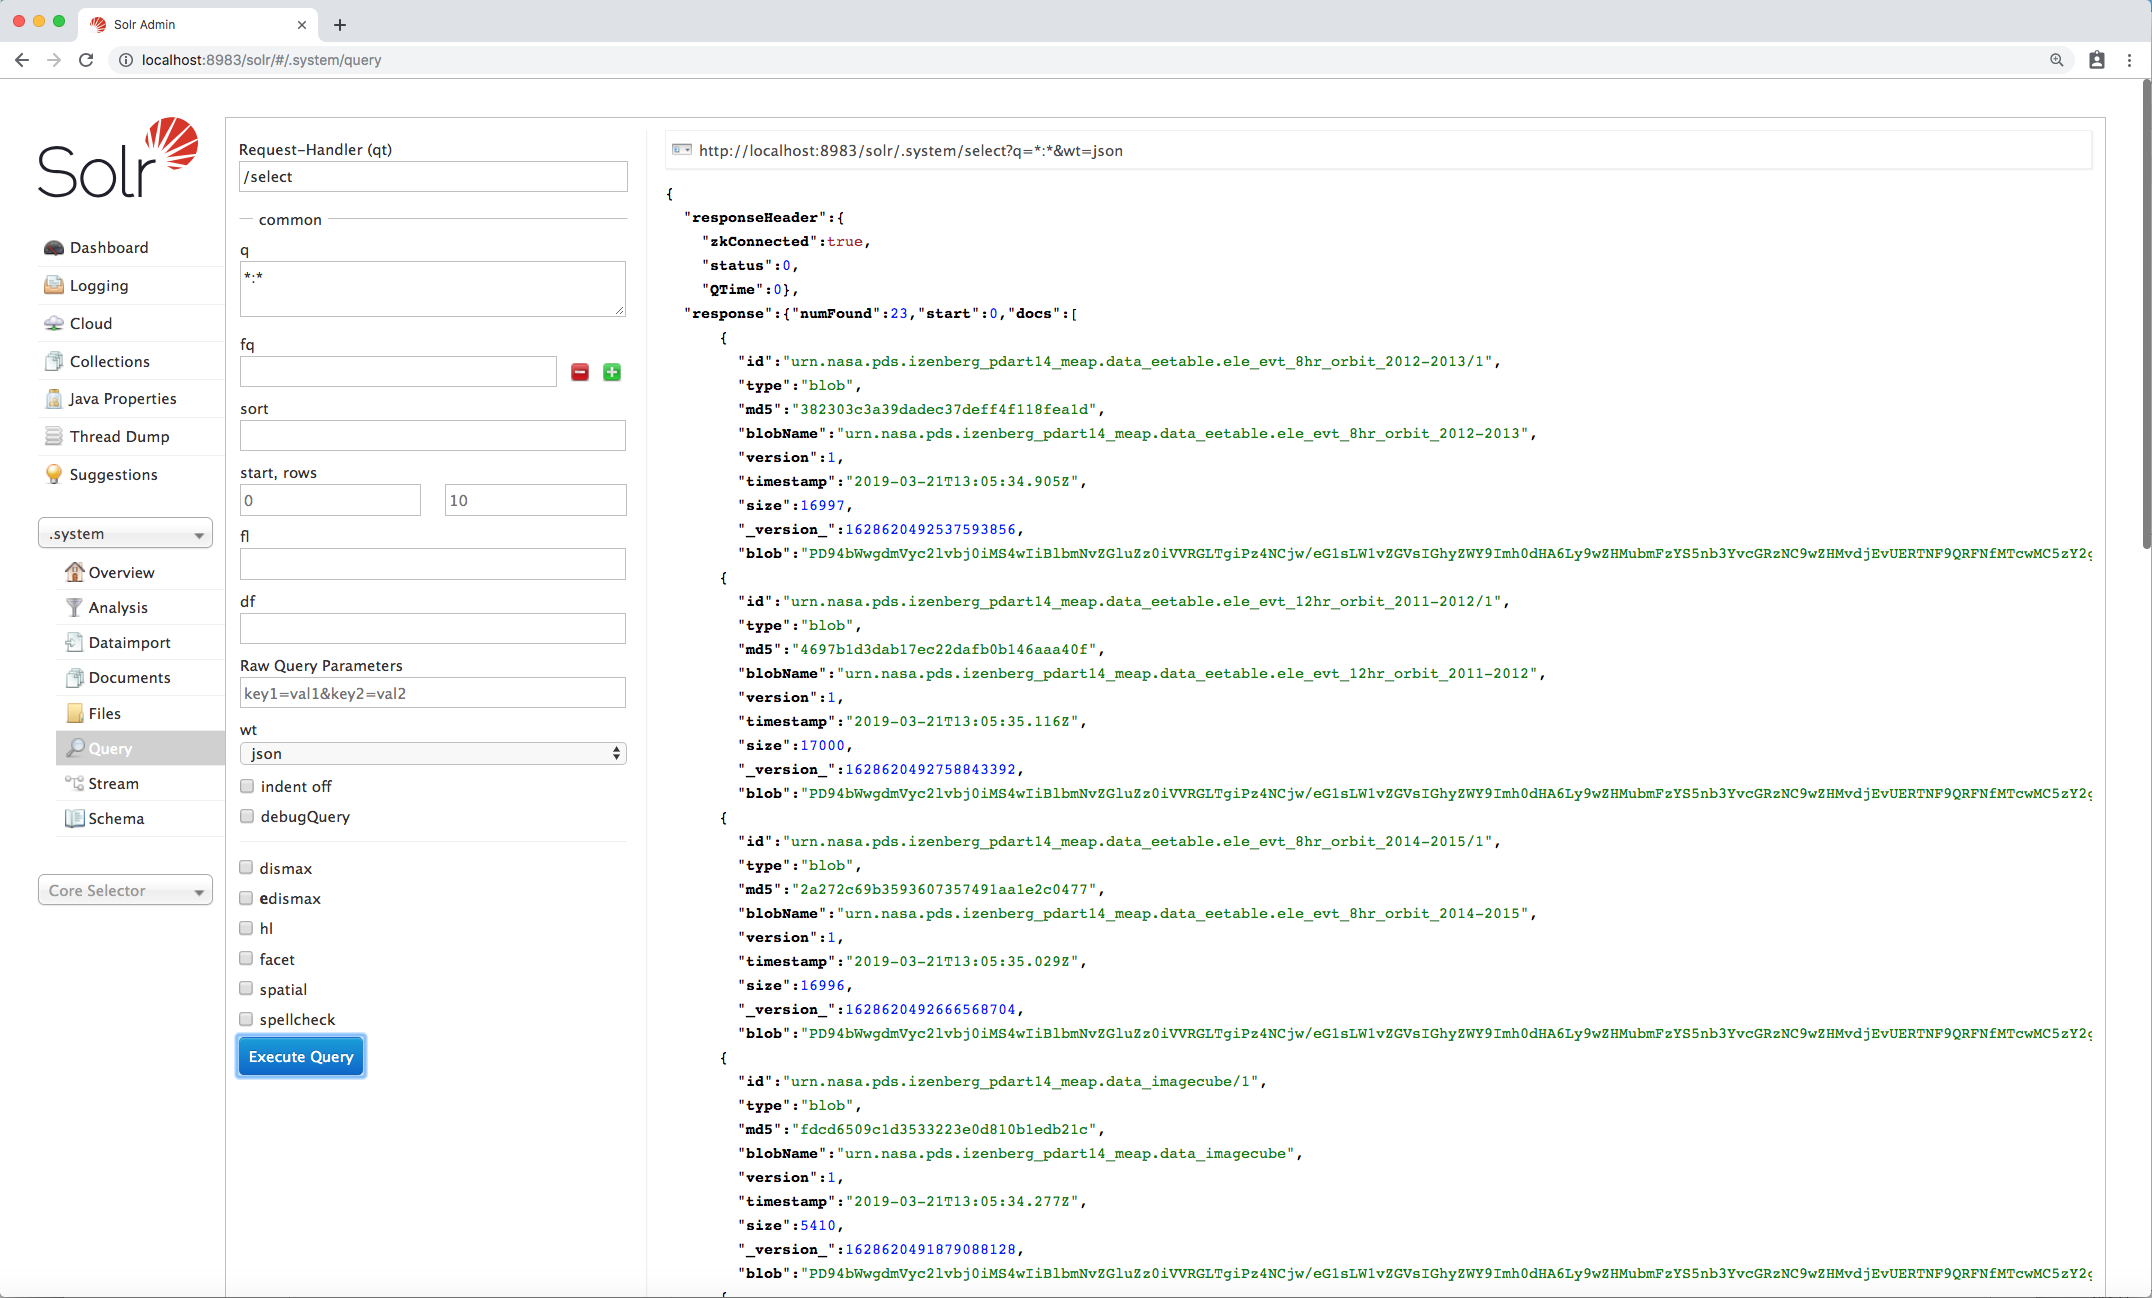
The query should return 21 documents. Additionally, Harvest Tool creates a solr-docs folder at the current working directory, which contains the Solr documents associated with the Harvest run to be used in a later step to post to the Search Service. Verify that this was created:
% ls -1 solr-docs
solr_doc_0.xml
Use the Solr Post command to post the Solr Documents to the Search Service. Depending on your deployment set up, go to the appropriate section below:
Non-Dockerized Instances of Search Service
If you have deployed a non-dockerized instance of the Search Service, run the following command:
% $SOLR_HOME/bin/post -c pds -params tr="add-hierarchy.xsl" $HOME/harvest-2.0.0/bin/solr-docs
This will post the Solr documents to a Solr collection named pds. The above command assumes that SOLR_HOME points to the top-level directory of the Solr directory and that the solr-docs directory, discussed in the previous step, resides in the Harvest Tool bin/ folder. You should see output similar to the following:
/Library/Java/JavaVirtualMachines/jdk1.8.0_101.jdk/Contents/Home/bin/java \
-classpath /Users/mcayanan/solr-7.6.0/dist/solr-core-7.6.0.jar \
-Dauto=yes -Dparams=tr=add-hierarchy.xsl -Dc=pds -Ddata=files \
-Drecursive=yes org.apache.solr.util.SimplePostTool \
/Users/mcayanan/harvest-2.0.0/bin/solr-docs
SimplePostTool version 5.0.0
Posting files to [base] url http://localhost:8983/solr/pds/update?tr=add-hierarchy.xsl...
Entering auto mode. File endings considered are \
xml,json,jsonl,csv,pdf,doc,docx,ppt,pptx,xls,xlsx, \
odt,odp,ods,ott,otp,ots,rtf,htm,html,txt,log
Entering recursive mode, max depth=999, delay=0s
Indexing directory /Users/mcayanan/harvest-2.0.0/bin/solr-docs (1 files, depth=0)
POSTing file solr_doc_0.xml (application/xml) to [base]
1 files indexed.
COMMITting Solr index changes to http://localhost:8983/solr/pds/update?tr=add-hierarchy.xsl...
Time spent: 0:00:00.635
Dockerized Instances of Search Service
If you have deployed a dockerized instance of the Search Service, run the following command:
% docker exec -it search-service post -c pds -params "tr=add-hierarchy.xsl" /data/solr-docs
This will post the Solr documents to a Solr collection named pds. The above command assumes that search-service is the name of the docker container running the Search Service and that the /data/solr-docs directory contains the Solr Documents that were generated in the previous step. You should see output similar to the following:
$ docker exec -it search-service post -c pds -params "tr=add-hierarchy.xsl" /data/solr-docs
/docker-java-home/bin/java -classpath /opt/solr/dist/solr-core-7.7.0.jar \
-Dauto=yes -Dparams=tr=add-hierarchy.xsl -Dc=pds -Ddata=files \
-Drecursive=yes org.apache.solr.util.SimplePostTool /data/solr-docs
SimplePostTool version 5.0.0
Posting files to [base] url \
http://localhost:8983/solr/pds/update?tr=add-hierarchy.xsl... \
Entering auto mode. File endings considered are \
xml,json,jsonl,csv,pdf,doc,docx,ppt,pptx,xls,xlsx,\
odt,odp,ods,ott,otp,ots,rtf,htm,html,txt,log
Entering recursive mode, max depth=999, delay=0s
Indexing directory /data/solr-docs (1 files, depth=0)
POSTing file solr_doc_0.xml (application/xml) to [base]
Indexing directory /data/solr-docs/solr-docs (0 files, depth=1)
1 files indexed.
COMMITting Solr index changes to \
http://localhost:8983/solr/pds/update?tr=add-hierarchy.xsl...
Time spent: 0:00:00.719
Assuming the above command completes successfully, the Search Service should now contain the products from the Example Bundle. This can be verified via the Search Service Admin interface (http://localhost:8983/solr). Using your favorite web browser, go to the Admin interface and query against the pds collection. You should see something similar to the following:

Exercise Wrap Up
In addition to the exercises above, the Nodes are encouraged to exercise the Generate Tool, Transform Tool and PDS4 Tools components. See the corresponding Installation and Operation documents for details. For advanced installations, the Transport components may also be installed (details to come later).
The final step of this exercise is to delete the Example Bundle from the Search Service. This can be accomplished with the REST-based Service Calls to the Search Service.
The following command will delete contents from the pds Solr collection:
% curl "http://localhost:8983/solr/pds/update?commit=true" -H "Content-Type: text/xml" \
--data-binary '<delete><query>*:*</query></delete>'
<?xml version="1.0" encoding="UTF-8"?>
<response>

  <lst name="responseHeader">
    <int name="rf">1</int>
    <int name="status">0</int>
    <int name="QTime">26</int>
  </lst>
</response>
The following command will delete the contents from the .system Solr collection where the Product labels are stored:
% curl "http://localhost:8983/solr/.system/update?commit=true" -H "Content-Type: text/xml" \
--data-binary '<delete><query>*:*</query></delete>'

<?xml version="1.0" encoding="UTF-8"?>
<response>

  <lst name="responseHeader">
    <int name="rf">2</int>
    <int name="status">0</int>
    <int name="QTime">38</int>
  </lst>
</response>
Now the Search Service is ready for your Bundles.