This document describes how to install the Registry User Interface software contained in the registry-ui package. The following topics can be found in this document:
This section details the system requirements for installing and operating the Registry User Interface.
The Registry User Interface was developed using Java and will run on any platform with a supported Java Runtime Environment (JRE). The software was specifically compiled for Java version 1.7 and has been tested with this version and version 1.8. The following commands test the local Java installation in a UNIX-based environment:
% which java
/usr/bin/java

% java -version
java version "1.7.0_72"
Java(TM) SE Runtime Environment (build 1.7.0_72-b14)
Java HotSpot(TM) 64-Bit Server VM (build 24.72-b04, mixed mode)
The first command above checks whether the java executable is in the environment's path and the second command reports the version. If Java is not installed or the version is not at least 1.7, Java will need to be downloaded and installed in the current environment. Consult the local system administrator for installation of this software. For the do-it-yourself crowd, the Java software can be downloaded from the Oracle Java Download page. The suggested software package is the Java Standard Edition (SE) 7, either the JDK or the JRE package. The JDK package is not necessary to run the software but could be useful if development and compilation of Java software will also occur in the current environment.
The Registry User Interface requires a Java application server for hosting the web application. The suggested application server for this release is Apache Tomcat with a minimal version of 7.0.X. Consult the local system administrator for installation of this software. For the do-it-yourself crowd, see the Tomcat Deployment document for installation and configuration details. If viewing this document from the registry-ui package, view the Tomcat Deployment document from the Engineering Node site.
The top-level directory where Apache Tomcat is installed (i.e. the directory containing the webapps and conf sub-directories) will be referenced in these instructions as $TOMCAT_HOME.
Download the registry-ui package from the PDS FTP site. The binary distribution is available in identical zip or tar/gzip packages. The installation directory may vary from environment to environment but in UNIX-based environments it is typical to install software packages in the /usr/local directory and in Windows-based environments it is typical to install software packages in the C:\Program Files directory. Unpack the selected binary distribution file with one of the following commands:
% unzip registry-ui-1.13.0-bin.zip
or
% tar -xzvf registry-ui-1.13.0-bin.tar.gz
Note: Depending on the platform, the native version of tar may produce an error when attempting to unpack the distribution file because many of the file paths are greater than 100 characters. If available, the GNU version of tar will resolve this problem. If that is not available or cannot be installed, the zipped package will work just fine in a UNIX environment.
The commands above result in the creation of the registry-ui-1.13.0 directory with the following directory structure:
A README file directing the user to the available documentation for the project.
The copyright notice from the California Institute of Technology detailing the restrictions regarding the use and distribution of this software. Although the license is strictly worded, the software has been classified as Technology and Software Publicly Available (TSPA) and is available for anyone to download and use.
This is the Web ARchive (WAR) file containing the Registry User Interface software including all dependent JAR files.
This directory contains a local web site with the Registry User Interface documentation, javadoc, unit test results and other configuration management related information. Just point the desired web browser to the index.html file in this directory.
The Registry User Interface web application is packaged as a WAR file and is intended for installation under a standard Java Application Server. If there was a previous installation of the Registry User Interface, the application should be un-deployed from the Tomcat server. This can be accomplished by deleting the application directly (assuming the user has appropriate permission) from the $TOMCAT_HOME/webapps directory (the variable $TOMCAT_HOME may not be set in your environment, if not, replace with the absolute path to the Tomcat installation):
% cd $TOMCAT_HOME/webapps
% rm -rf registry-ui registry-ui.war
Alternatively, if the Tomcat Manager interface was utilized for the deployment, find the Registry User Interface entry in the Manager interface and select the Undeploy button to remove the application from the server.
In order to deploy the software for either a new or upgrade installation, the WAR file is normally copied directly to the $TOMCAT_HOME/webapps directory (assuming the user has appropriate permission) or installed via the Manager interface. To copy the WAR file directly, perform the following commands:
% cd registry-ui-1.13.0
% cp registry-ui.war $TOMCAT_HOME/webapps
By default, the Registry User Interface comes configured to access two Registry Service instances. The PDS3 instance at the end point http://localhost:8080/registry-pds3/ and the PDS4 instance at the end point http://localhost:8080/registry-pds4/. If the local environment requires a different configuration, please contact the Engineering Node so that a customized configuration can be built for the local environment.
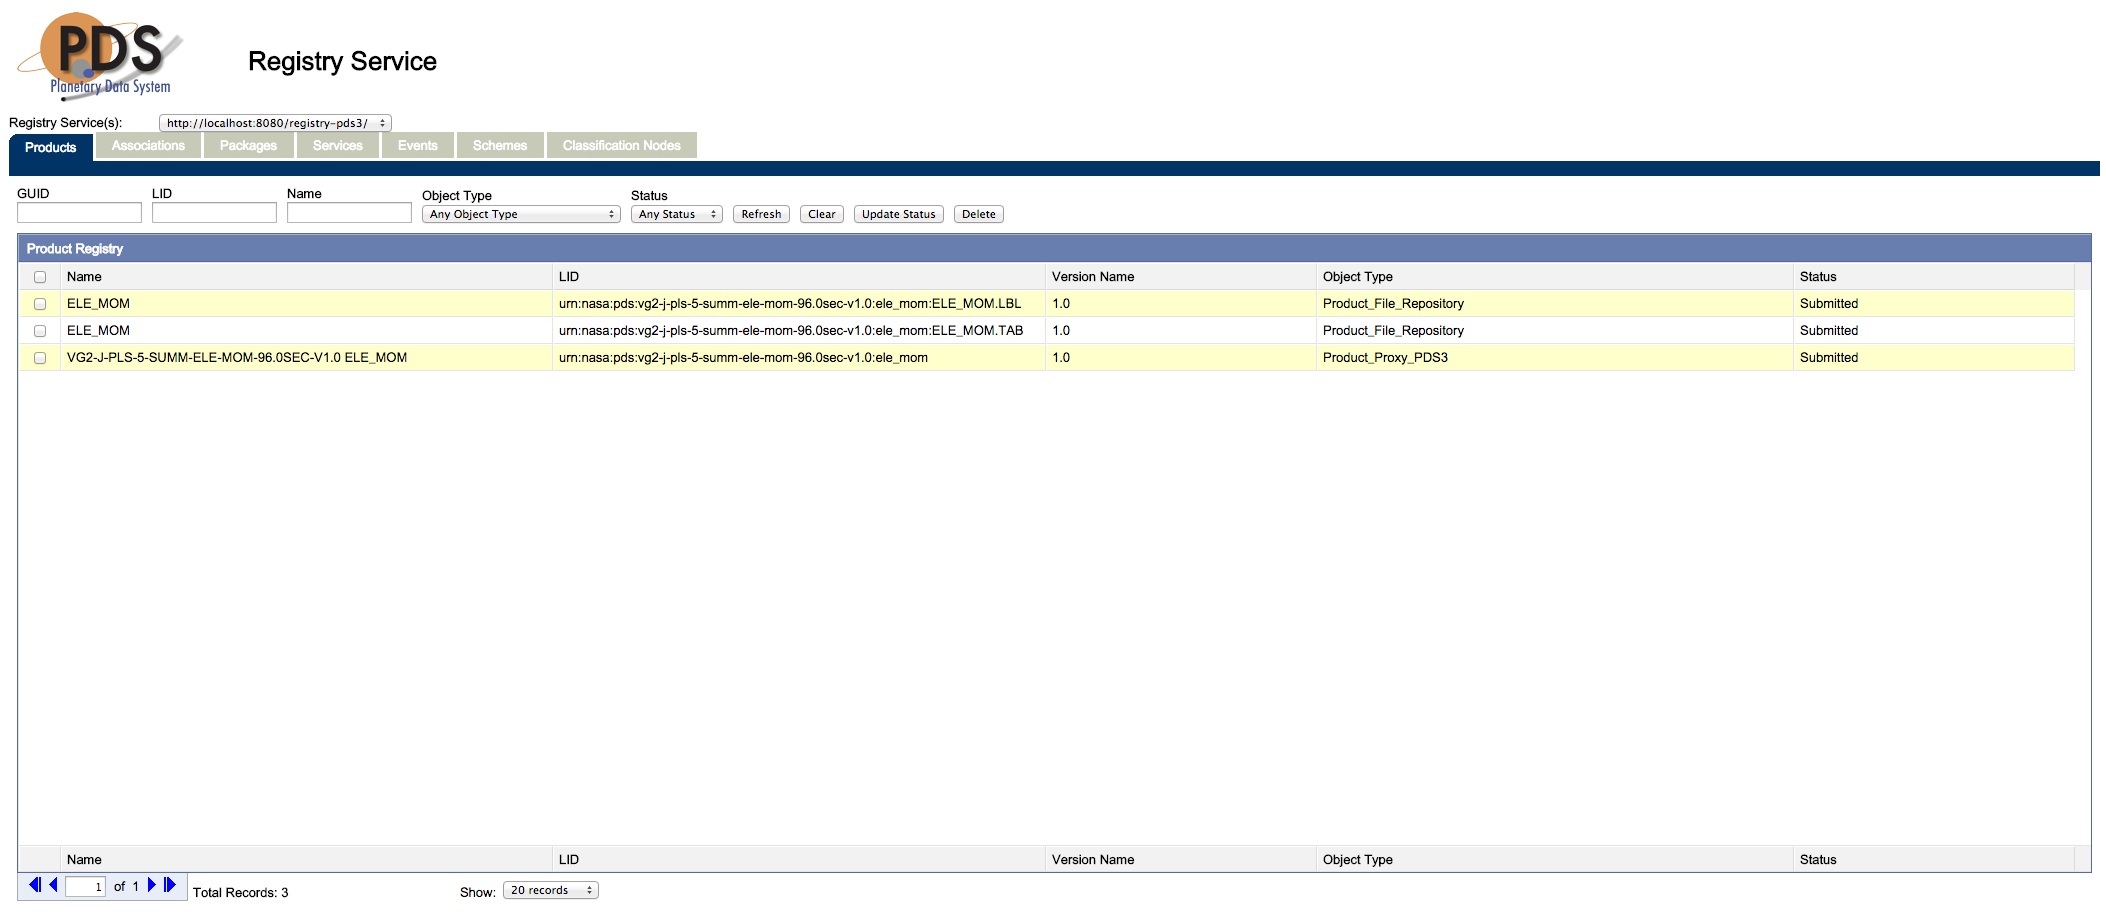
Once this step is complete, the application is ready for operation. Verify a successful installation by accessing the component from your favorite web browser at the end point http://localhost:8080/registry-ui. Assuming the Registry Service instances are up-and-running, the home page of the application should display in the web browser with a list of products from the PDS3 Registry Service instance, assuming it is populated:
By default, the Registry User Interface comes configured to access the Registry Service instances at the end points http://localhost:8080/registry-pds3 and http://localhost:8080/registry-pds4. If the local configuration is different, this should be modified to represent the end point(s) of the Registry Service(s) target installation. To modify the configuration, edit the services.js file located in the $TOMCAT_HOME/webapps/registry-ui directory. Modify the following with the new end point(s):
var services = {
   endpoint: "http://localhost:8080/registry-pds3/,http://localhost:8080/registry-pds4/"
};
As in the default configuration above, multiple Registry Service end points should be separated by a comma.
The preferred configuration for securing applications on the Tomcat server is to limit access via firewall configuration so that external access is blocked but internal access is allowed. Internal access could be limited to users on the local server or could allow servers on the same subnet access. If these kinds of limitations are not possible in the local environment, then the secure configuration described in this section should be implemented.
The following steps configure the Registry User Interface for secure access within the Tomcat server. See the Tomcat Deployment document for details on securing the Tomcat server to support the application configuration that follows. To modify the configuration, edit the web.xml file located in the $TOMCAT_HOME/webapps/registry-ui/WEB-INF directory. Add the following blocks of XML to the end of the file:
<web-app>
  ...
  <security-constraint>
    <web-resource-collection>
      <web-resource-name>Registry User Interface</web-resource-name>
      <url-pattern>/*</url-pattern>
    </web-resource-collection>
    <auth-constraint>
      <role-name>{node}-admin</role-name>
    </auth-constraint>
    <user-data-constraint>
      <transport-guarantee>NONE</transport-guarantee>
    </user-data-constraint>
  </security-constraint>

  <login-config>
     <auth-method>BASIC</auth-method>
     <realm-name>Tomcat User Manager</realm-name>
  </login-config>

  <security-role>
     <role-name>{node}-admin</role-name>
  </security-role>
</web-app>
The configuration above restricts access to the entire application. In addition, it sets up the security role that was configured during the Tomcat server installation. If the configuration was changed above, the Tomcat server must be restarted.
