Documentation
Modules
Project Documentation

Many of the components of the PDS system are packaged as Java-based web applications and require a Java Application Server to host them. Although there are a few free choices out on the market (e.g., Glassfish, Jetty, etc.) the EN development team consistently uses Apache Tomcat as its application server of choice. This document details the download, installation and configuration of an Apache Tomcat server for use in hosting PDS web applications.
New releases of the Apache Tomcat server are made available periodically, with the latest version of 7.0.X available from the Apache Tomcat 7 Downloads page. Version 8.0.X is available from the Apache Tomcat 8 Downloads page. The download page has several binary distributions to choose from:

The first two listed under the Core bullet work nicely in UNIX-based environments. This deployment example assumes download and installation of the TAR/GZIP package. Select the link of the desired package to download the file to a local machine. In UNIX-based environments it is common to install additional machine-wide accessible software in the /usr/local directory. Depending on the machine, this may require root privileges. Copy the downloaded package file to this directory.
Installation, at least in the UNIX environment, is as simple as unpacking the downloaded package. Execute the following commands to unpack the software and create a symbolic link to the resulting directory:
% cd /usr/local
% tar xzvf apache-tomcat-7.0.X.tar.gz
% ln -s apache-tomcat-7.0.X tomcat
The symbolic link will be useful when upgrading to future versions, minimizing the number path changes to be made in startup scripts. There are a number of configuration options that can be made to a Tomcat deployment but the software will pretty much run out of the box. Extensive documentation with respect to configuration options is available from the Apache Documentation 7 Documentation Index page. That said, this document will cover general and secure configuration for a PDS installation below.
General configuration consists of modifying the port number that the server listens to and enabling access to the Manager interface.
By default, Tomcat comes configured to listen for requests on port 8080. This is actually a very common test port for various web server applications and may conflict with an existing application running in the local environment. To change the port number, execute the following commands to edit the server.xml configuration file (the example uses vi, but any editor will suffice):
% cd /usr/local/tomcat/conf
% vi server.xml
A search for 8080 should discover the following block of XML statements:
<Server port="8005" shutdown="SHUTDOWN">
  ...
  <Service name="Catalina">
    ...
    <Connector port="8080" protocol="HTTP/1.1"
               connectionTimeout="20000"
               redirectPort="8443" />
    ...
  </Service>
</Server>
In general, ports 1023 and below are commonly reserved by the system and require root user privileges to access. Ports 1024 through 49151 are sporadically used by applications registered with IANA. If the need is for another available port, than ports in the 9000 range are commonly available without conflict in most environments. The following three scenarios will help guide the port selection:
Another common configuration change involves enabling the Manager interface. The Manager interface is not necessary to run Tomcat but it is nice for viewing status and deploying applications. In order to enable the interface, an account must be specified in the Tomcat users configuration file with the appropriate role. Execute the following commands to edit the tomcat-users.xml configuration file:
% cd /usr/local/tomcat/conf
% vi tomcat-users.xml
Add the two XML statements listed below within the <tomcat-users> block.
<tomcat-users>
  ...
  <role rolename="manager-gui"/>
  <user username="<username>" password="<password>" roles="manager-gui"/>
  ...
</tomcat-users>
The first statement defines the manager-gui role and the second statement defines a user with that role. Replace the <username> and <password> in the second statement with desired values for the local environment. This document discusses using the Manager interface in the Deploy Application section below.
The Tomcat application server allows environment-specific variables to be set and utilized by the server. This is accomplished by creating a file named setenv.sh in the /usr/local/tomcat/bin directory. This file will be sourced by the startup script specified in the Launch Tomcat section below. To adjust the memory settings for Tomcat, the contents of the file should look something like the following:
#!/bin/sh
CATALINA_OPTS="-Xms512m -Xmx2048m -XX:MaxPermSize=256m"
Note: For Red Hat RPM installations, the environment variables can be specified in the /etc/tomcatX/tomcatX.conf file where X is the major version of Tomcat. Although the environment configuration is not limited to the following variables, these two are the most common:
This environment variable allows the user to pass in application-specific Java properties to the applications that are deployed on the Tomcat server. In the example above, the initial and maximum memory settings for Tomcat are specified. Although exhaustive testing has not been performed, these settings have worked well in a number of environments. The location of the Derby database for the Registry Service may also be specified in this variable with the derby.system.home property. This property is described in more detail in the Installation document for the Registry Service.
In most environments there will be one Java installation and this variable should reference the root directory of that installation (i.e., JAVA_HOME=/usr/local/java). Because Tomcat 7 and the PDS software require Java 1.6, it may have been required to install this version of Java while version 1.5 was already installed in the local environment. By referencing the Java 1.6 installation with this variable in the setenv.sh script, it allows the rest of the local environment to utilize the Java 1.5 installation.
If the local installation requires secure access, then follow the instructions in this section to secure the installation. This is not common and would only be required is exposing the Tomcat Server to the public network. It is suggested that the port hosting the Tomcat Server only allow local server access or access to servers from the same subnet. This configuration coupled with a few reverse proxy configurations from a publicly available Apache HTTPD Server (as suggested in the Release Description document), for example, provide sufficient security for the Tomcat Server while allowing its hosted applications to function properly.
Although a certificate can be purchased from a well-known Certificate Authority(CA) such as VeriSign or Thawte, this section will detail generating a self-signed certificate. Execute the following command to generate a self-signed certificate for the Tomcat Server:
% $JAVA_HOME/bin/keytool -genkey -alias <virtual-host-name> -keyalg RSA \
-keystore /usr/local/tomcat/.keystore
The <virtual-host-name> parameter above should be the name of the machine where the Tomcat Server will be accessed. The password entered in the first password prompt will be the password for the keystore where your server certificate is stored. The keytool command will prompt for additional information. The following is an example of executing the keytool command in the EN environment:
Enter keystore password:  <password>
Re-enter new password: <password>
What is your first and last name?
  [Unknown]:  Sean Hardman
What is the name of your organizational unit?
  [Unknown]:  Engineering Node
What is the name of your organization?
  [Unknown]:  Planetary Data System
What is the name of your City or Locality?
  [Unknown]:  Pasadena
What is the name of your State or Province?
  [Unknown]:  California
What is the two-letter country code for this unit?
  [Unknown]:  US
Is CN=Sean Hardman, OU=Engineering Node, O=Planetary Data System, \
L=Pasadena, ST=California, C=US correct?
  [no]:  yes

Enter key password for <pdsops.jpl.nasa.gov>
  (RETURN if same as keystore password):
Although the above is informational, it will help browser clients identify the source of the certificate.
After generating the server certificate, configure the Tomcat Server to enable Secure Sockets Layer (SSL) access. Execute the following commands to edit the server.xml configuration file (the example uses vi, but any editor will suffice):
% cd /usr/local/tomcat/conf
% vi server.xml
Configure the Tomcat Server to listen on the port 8443, with an SSL transport. Make sure the following block is not commented out and add the keystoreFile and keystorePass attributes as follows:
<Connector port="8443" protocol="HTTP/1.1" SSLEnabled="true"
          maxThreads="150" scheme="https" secure="true"
          clientAuth="false" sslProtocol="TLS"
          keystoreFile="/usr/local/tomcat/.keystore"
          keystorePass="<password>"/>
The <password> value should be the password that was entered above during the certificate generation step. To enable the single sign on feature of the Tomcat server, make sure following element is not commented out:
<Valve class="org.apache.catalina.authenticator.SingleSignOn"/>
Additional configuration is required for each deployed application (e.g., Registry Service) to take advantage of secure access via SSL. See the Installation documents for each of those services.
Setup user accounts for accessing the secure Tomcat Server. These accounts must be specified in the Tomcat users configuration file with the appropriate role. Execute the following commands to edit the tomcat-users.xml configuration file:
% cd /usr/local/tomcat/conf
% vi tomcat-users.xml
Add the two XML statements listed below within the <tomcat-users> block.
<tomcat-users>
  ...
  <role rolename="{node}-admin"/>
  <user username="<username>" password="<password>" roles="{node}-admin"/>
  ...
</tomcat-users>
The first statement defines the {node}-admin role and the second statement defines a user with that role. Replace the {node} portion of the role with your PDS Node abbreviation (e.g., atm, en, geo, img, naif, ppi, rings, rs, sbn). Replace the <username> and <password> in the second statement with the desired account for the local environment.
Launching the Tomcat server is relatively straight forward as long as the JAVA_HOME environment variable is set appropriately. Execute the following commands to launch the Tomcat server:
% cd /usr/local/tomcat/bin
% ./startup.sh
If launching the Tomcat server automatically upon system startup is desired, the Tomcat Setup portion of the Tomcat documentation provides details on setting this up. Alternatively, consult your system administrator for standard mechanisms of accomplishing this in the local environment. Once the Tomcat server has been launched by one of the methods above, the server should be accessible via the following URL: http://localhost:8080/. This assumes the listening port was not changed during the configuration. Accessing this URL from the desired web browser, should produce the following display:

There are a few methods for deploying web applications (e.g., Registry Service, Registry User Interface, etc.) to the Tomcat server and two of them are discussed here. The first is to simply copy the WAR file from the software distribution package into the /usr/local/tomcat/webapps/ directory. The second is to access the Tomcat Manager interface from the Manager App button on the Welcome page displayed in the image above. The user is prompted to enter the username and password that was specified during the configuration. Upon successful authentication and authorization, the following page should be displayed:
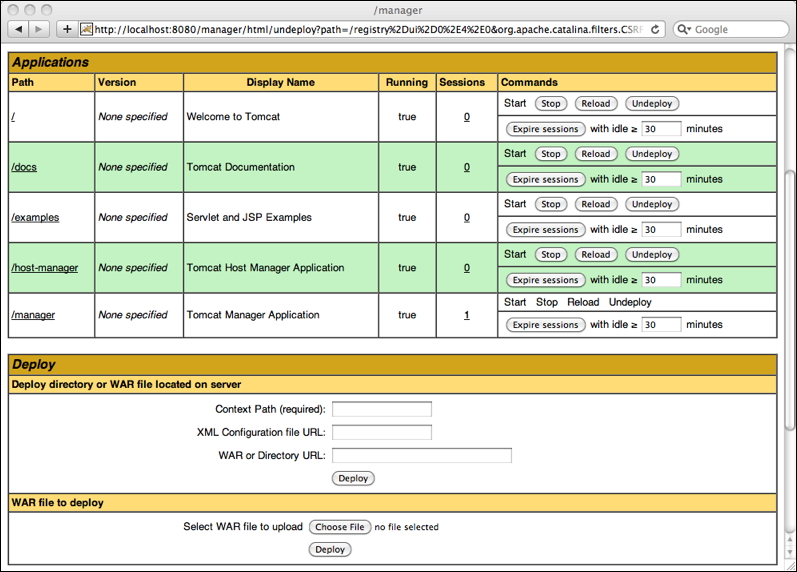
Scrolling down towards the bottom of the page will expose the WAR file to deploy section of the page. From there, choose the WAR file from a local disk and then select the Deploy button to deploy the application to the Tomcat server.
For both methods of deployment, the application will be accessible from the base URL followed by a "/" and then the name of the WAR file minus the extension. So, the Registry Service would be accessible at the following URL: http://localhost:8080/registry/. This assumes the user followed the installation instructions for the Registry Service and renamed the WAR file to registry.war.
Execute the following commands to shutdown the Tomcat server:
% cd /usr/local/tomcat/bin
% ./shutdown.sh
Depending on the environment or the load that the Tomcat server is under, it may fail to shutdown completely. Normally this won't be discovered until the user attempts to start the server again, where they will most likely encounter a "port in use" message.
% ps -ef | grep tomcat
You should get something like the following, assuming the server is still up and running:
pds   16870     1  0 Feb15 ?        00:04:43 /usr/java/latest/bin/java \
  -Djava.util.logging.config.file=/usr/local/acce/tomcat5/conf/logging.properties \
  -Djava.util.logging.manager=org.apache.juli.ClassLoaderLogManager \
  -Djava.endorsed.dirs=/usr/local/acce/tomcat5/common/endorsed \
  -classpath /usr/local/acce/tomcat5/bin/bootstrap.jar \
  -Dcatalina.base=/usr/local/acce/tomcat5 \
  -Dcatalina.home=/usr/local/acce/tomcat5 \
  -Djava.io.tmpdir=/usr/local/acce/tomcat5/temp org.apache.catalina.startup.Bootstrap start
The process listed above can be terminated with the following command by specifying its process identifier (16870 as listed in the example above):
% kill -9 16870
The successful termination can be tested by re-executing the ps command from above which returns an empty result set this time around. If for some reason it is still lingering, ask the local system administrator to terminate the process for you.