 |
|
|
 |
Documentation
Components
Project Documentation

Release Description 1.2.0
This release of the PDS 2010 System represents Build 1d and is intended as a prototype release in support of the assessment of the PDS4 standards and the system components to date. The following sections can be found in this document:
Reference Documents
This section details the controlling and applicable documents referenced for this release. The controlling documents are as follows:
- Planetary Data System (PDS) Level 1, 2 and 3 Requirements, March 26, 2010.
- Planetary Data System (PDS) 2010 Project Plan, February 2010.
- Planetary Data System (PDS) 2010 System Architecture Specification, Version 1.2, May 25, 2011.
- Planetary Data System (PDS) 2010 Operations Concept, February 2010.
- Planetary Data System (PDS) General System Software Requirements Document (SRD), Version 1.0, June 11, 2011.
- Planetary Data System (PDS) Harvest Tool Software Requirements and Design Document (SRD/SDD), Version 1.0, June 12, 2011.
- Planetary Data System (PDS) Preparation Tools Software Requirements and Design Document (SRD/SDD), Version 0.1, October 6, 2010.
- Planetary Data System (PDS) Registry Service Software Requirements and Design Document (SRD/SDD), Version 1.0, June 12, 2011.
- Planetary Data System (PDS) Report Service Software Requirements and Design Document (SRD/SDD), Version 1.0, June 12, 2011.
- Planetary Data System (PDS) Security Service Software Requirements and Design Document (SRD/SDD), Version 1.0, June 11, 2011.
The applicable documents are as follows:
- NASA Planetary Data System (PDS) 2010 System Build I Test Plan
Capabilities
This section details the new, modified and corrected capabilities that comprise this release. They are summarized here for a system-level view. A more detailed list of capabilities can be found in the release notes and change logs for each component.
New Capabilities
The following capabilities are new for this release:
- Generate Tool, developed by the Imaging Node at JPL, is available for generating PDS4 labels from PDS3 labels.
- Harvest Tool now includes support file object registration and registration of PDS3 products using a proxy label to facilitate tracking.
- Registry Service added support for replication from one registry instance to another.
- Registry Service and Harvest Tool added support for package registration allowing enabling support for actions like approval and deletion to be applied to all members of a package in the Registry Service.
- Report Service added support for remote transfer of log files, automatic triggering of database updates and default profile setup.
Modified Capabilities
The following capabilities have been modified for this release:
- Harvest Tool was modified to represent LID-based references as slots instead of associations as well as modified to keep pace with changes occurring in the PDS4 data model and the Registry Service interface.
- Registry User Interface was modified to keep pace with the changes to the Registry Service interface.
- Validate Tool was modified to include the latest set of generic schemas generated from the data model.
Liens
This section details the liens against the capabilities that have yet to be implemented or are partially implemented. They are summarized here for a system-level view. A more detailed list of liens can be found in the release notes for each component.
- Need to expand the Registry Service functionality to include registration of federation and registry objects.
- Need to expand the Registry User Interface to support browsing of objects beyond products and associations. Also need to add support for updating status and single product registration.
System Requirements
This section details the system requirements for installing and operating the software. Specific system requirements for each component in this release can be found in their respective Installation documents.
Java Runtime Environment
The custom software contained in this release was developed using Java and will run on any platform with a supported Java Runtime Environment (JRE). The software was specifically developed under Java version 1.6 and has only been tested with this version. The following commands test the local Java installation in a UNIX-based environment:
% which java
/usr/bin/java

% java -version
java version "1.6.0_26"
Java(TM) SE Runtime Environment (build 1.6.0_26-b03-384-10M3425)
Java HotSpot(TM) 64-Bit Server VM (build 20.1-b02-384, mixed mode)
The first command above checks whether the java executable is in the environment's path and the second command reports the version. If Java is not installed or the version is not at least 1.6, Java will need to be downloaded and installed in the current environment. Consult the local system administrator for installation of this software. For the do-it-yourself crowd, the Java software can be downloaded from the Oracle Java Download page. The software package of choice is the Java Standard Edition (SE) 6, either the JDK or the JRE package. The JDK package is not necessary to run the software but could be useful if development and compilation of Java software will also occur in the current environment.
Java Application Server
The other main system requirement pertains to providing a Java application server for hosting certain components (Registry Service, Registry User Interface and Report Service). The suggested application server for this release is Apache Tomcat with a minimal version of 6.0.20 through version 7.0.X. Consult the local system administrator for installation of this software. For the do-it-yourself crowd, the Apache Tomcat software can be downloaded from the Apache Tomcat page. Choose the version to download (6.0 or 7.0) from the menu on the left. Details on downloading, installing and configuring an Apache Tomcat server can be found in the Tomcat Deployment document.
Installation/Operation
This section details the installation and operation of the software in this release. This release is intended for deployment in the Engineering Node operations environment with certain components deployed in the environments of participating Nodes. Details regarding the release for each of these components, including installation of the packages and operation of the associated software, can be found in the documentation for each component. This release is comprised of the following components:
- Harvest Tool - 0.4.0
- Preparation Tools
- Core Library - 0.3.0
- Design Tool - 0.2.0
- Generate Tool - 0.1.0
- Validate Tool - 0.3.0
- Registry
- Registry Core - 0.2.0
- Registry Service - 0.7.0
- Registry User Interface - 0.4.0
- Report Service
- Update Tool - 0.1.0
- Profile Setup - 0.1.0
- Sawmill - 0.2.0
- Security Service - 0.3.0
Not all of the above components are required for a given installation of the software for this release. The following sections detail typical deployment scenarios for the Engineering Node and the Discipline Nodes, respectively.
Engineering Node Environment
This section details deployment to the Engineering Node operations environment. The following diagram details the deployment of the major components of this release and gives a very high-level view of the interfaces between the components and system resources:
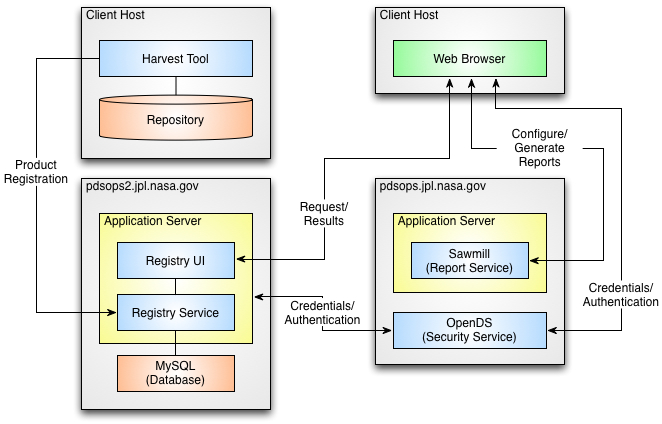
If viewing this document in online form, click the image for a larger version.
The components depicted above serve as the operational deployment of this release for the Engineering Node. The main purpose of this deployment is for demonstration and testing purposes.
- Registry Service
The Registry Service provides functionality for tracking, auditing, locating and maintaining artifacts within the system. For this release, the registry is populated with the PDS4 context products migrated from the PDS3 central catalog database. New for this release, the EN deployment will utilize MySQL as the backend database for the service.
- Registry User Interface
The Registry User Interface provides a simple viewing capability of the contents of the associated Registry Service. It is intended to offer visual verification of successful registration of products.
- Report Service
The Report Service provides the capability for capturing and reporting metrics. With this release and the previous release, this service is undergoing testing of configurations and features with a set of metrics from the Engineering Node and the Imaging Node at JPL. This service is not yet available to the user community.
- Security Service
The Security Service provides authentication and authorization functions for the system. This service is satisfied with an open source directory service. The directory service is populated with the PDS personnel list extracted from the PDS3 central catalog database. The application server hosting the Registry Service and Registry User Interface is configured to restrict access to certain URLs and to forward those requests to this service for authentication and authorization.
- Harvest Tool
The Harvest Tool provides the means for registering products with the Registry Service. This tool reads a PDS4 product label, extracts specified metadata and registers the product with the registry. This tool allows the user to register a batch of products and generates a summary report.
Discipline Node Environment
This section details the deployment to a participating Discipline Node environment. The Nodes are asked to download, install and exercise the software that makes up this release. The following diagram details an example deployment of selected components:
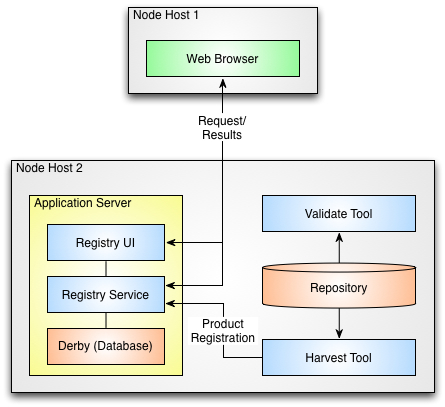
If viewing this document in online form, click the image for a larger version.
The selected components depicted above are intended to aid the Nodes in their PDS3 to PDS4 conversion exercises. The following diagram depicts a normalized system flow, starting with schema design, continuing onto data product label generation and validation and finishing up with data product registration:
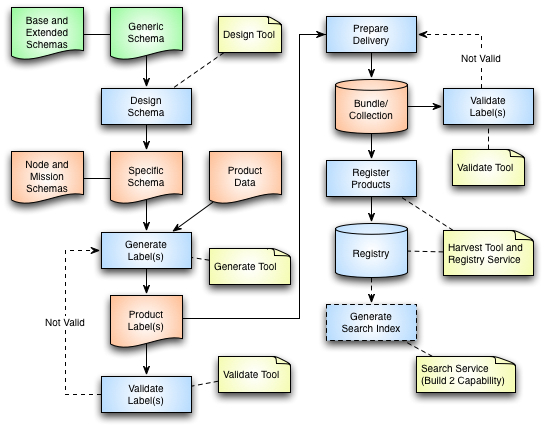
If viewing this document in online form, click the image for a larger version.
The system flow depicted above is described in more detail in the Data Provider's Handbook, albeit with a different flavor of this diagram. This diagram identifies where the system components come into play within the system flow. These components and the ones depicted in the deployment diagram, are described in more detail with respect to how the components can be utilized in the PDS3 to PDS4 conversion exercises with an eye towards testing these components for use in operations:
- Design Tool
Although not depicted in the deployment diagram, the Design Tool is intended to aid users in the development of their data product label schemas. This release identifies two off-the-shelf products (Oxygen and Eclipse) that are available for this purpose. The provided documentation guides the user with respect to the download, installation and operation of each of these products.
- Generate Tool
The Generate Tool is intended to aid users in the generation of their data product labels. This tool was developed by the Imaging Node at JPL and provides a command-line interface for generating PDS4 Labels from either a PDS3 Label or a PDS-specific DOM object.
- Validate Tool
The Validate Tool comes pre-packaged with the latest version of the generic schemas generated from the data model. The tool allows the user to validate collections of products or single products against the associated generic schema. Specific schemas can be passed into the tool to enable a more detailed validation check. Although the Design Tools listed above provide a file-by-file validation capability, this tool allows the user to validate a batch of products and generates a summary report.
- Registry Service
The Registry Service provides functionality for tracking, auditing, locating and maintaining artifacts within the system. Ultimately, all products (including PDS3 products) will be registered and tracked with the Registry Service. For this release, users are asked to install and configure a local instance of the service in order to exercise this procedure. Additionally if the user is participating in the PDS3 to PDS4 conversion exercises, the resulting products or collections of products can be registered with their local registry instance. By default, the registry will utilize Derby as the backend database for the service. The configuration can be modified after the installation to utilize MySQL as the database backend. If another database provider is desired, inform the Engineering Node development team and they will help to specify the proper configuration.
- Registry User Interface
The Registry User Interface provides a simple viewing capability of the contents of the associated Registry Service. It is intended to offer visual verification of successful registration of products.
- Harvest Tool
The Harvest Tool provides the means for registering products with the Registry Service. This tool reads a PDS4 product label, extracts specified metadata and registers the product with the registry. This tool allows the user to register a batch of products and generates a summary report.
Although the Design and Generate Tools are included with this release, we have not included them in the installation exercise because they may not pertain to every Discipline Node. The focus of this exercise will be the Registry Service, Registry User Interface, Harvest Tool and Validate Tool. Perform the following steps to download, install, configure and test the software in the Node's local environment. The example commands below assume the software is installed in the user's home directory, indicated by the $HOME environment variable. If this is not the case or if this variable is not defined, the absolute path should be used instead of the variable.
- Verify System Requirements
As specified in the System Requirements section above, the software requires Java and a Java Application Server to be installed and accessible. These installations should be verified before proceeding to the next step.
Although we have specified Java 1.6 and Tomcat 6.0 or 7.0, if a Node has Java 1.7 or another Java Application Server (e.g, Glassfish, Jetty, etc.) installed, we would be very interested in how the software functions in these environments. Feel free to install the software in these environments and let the EN development team know if there are any issues.
- Install Registry Service
The next step is to install the Registry Service. The Installation document for the Registry Service provides the details for downloading, installing and configuring the software. By default, the Registry Service comes packaged with and configured to utilize Apache Derby as the backend database for storing registered content. This database will be located in the directory where the Tomcat server was launched, by default. The Installation document describes how to change this location as well as how to use MySQL as the backend database instead of Derby. If a Node has another database server that they would like to use as the backend, please contact the EN development team for help with the configuration.
If there was a previous installation of the Registry Service, the application should be un-deployed from the application server and then remove the Derby database directory named RegistryDb and the derby.log file prior to installing the new version.
- Install Registry User Interface
The next step is to install the Registry User Interface. The Installation document for the Registry User Interface provides the details for downloading, installing and configuring the software. There is a typo in this document stating that the default endpoint is http://localhost:8080/registry when the actual default is http://localhost:8080/registry-service. The impact of this typo is that even if a default installation is performed, the endpoint will need to be changed.
- Install Harvest Tool
The next step is to install the Harvest Tool. The Installation document for the Harvest Tool provides the details for downloading and installing the software. By default, the Harvest Tool comes configured to access the Registry Service at the specific endpoint http://localhost:8080/registry-service. The same issue exists here as it does for the Registry User Interface and that is even if a default installation is performed, the endpoint will need to be changed. This should be modified to represent the endpoint of the Registry Service target installation. To change the endpoint, the Harvest script should be modified as follows:
java -Dpds.registry="http://localhost:8080/registry-service" \
-Dpds.security.keystore="${KEYSTORE}" -jar ${HARVEST_JAR} "$@"

  should be changed to (if hosted at node.nasa.gov on port 80):

java -Dpds.registry="http://node.nasa.gov/registry" \
-Dpds.security.keystore="${KEYSTORE}" -jar ${HARVEST_JAR} "$@"
To change the endpoint for Windows, the Harvest.bat script should be modified as follows:
java -Dpds.registry="http://localhost:8080/registry-service" \
-Dpds.security.keystore="%KEYSTORE%" -jar "%HARVEST_JAR%" %*

  should be changed to (if hosted at node.nasa.gov on port 80):

java -Dpds.registry="http://node.nasa.gov/registry" \
-Dpds.security.keystore="%KEYSTORE%" -jar "%HARVEST_JAR%" %*
The examples above have been broken into multiple lines for readability. The commands should be reassembled into a single line.
- Install Validate Tool
The next step is to install the Validate Tool. The Installation document for the Validate Tool provides the details for downloading and installing the software.
- Download Example Bundle
In order to test the software, we are going to use the example bundle that is referenced by the Data Provider's Handbook. The bundle has been modified slightly from the official version. The schemas directory was reorganized to facilitate validation. The bundle can be downloaded from http://pds.nasa.gov/repository/pds4/packages/VG2PLS_archive.zip. Unzipping the package results in a directory named VG2PLS_archive.
- Validate Example Bundle
The next step tests the Validate Tool by validating the example bundle. The Operation document for the Validate Tool provides the details for executing the software. Execute the Validate Tool against the example bundle with the following commands:
% cd $HOME/validate-0.3.0/bin
% ./Validate ../../VG2PLS_archive -e "*.xml"
The above run should result in a number of errors due to the fact that the product labels in the bundle do not conform to the data model as of the Build 1d release. If we validate against the schemas provided in the bundle, then the run will result in no errors found. For this release, the core.schema.dir Java property can be set to access a set of schemas outside of the tool. To enable this, the Validate script should be modified as follows:
java -jar ${VALIDATE_JAR} "$@"

  should be changed to:

java -Dcore.schema.dir=$HOME/VG2PLS_archive/schemas \
-jar ${VALIDATE_JAR} "$@"
To enable this for Windows, the Validate.bat script should be modified as follows:
java -jar "%VALIDATE_JAR%" %*

  should be changed to:

java -Dcore.schema.dir=$HOME/VG2PLS_archive/schemas \
-jar "%VALIDATE_JAR%" %*
The examples above have been broken into multiple lines for readability. The commands should be reassembled into a single line. A subsequent run of the tool against the example bundle (using the same command as used in the first run) should result in no errors found. Implementation of this feature is likely to change in Build 2 with the adoption of XML Schema 1.1 and the use of XML Catalogs.
- Register Example Bundle
The next step tests the Harvest Tool and Registry Service by registering the contents of the example bundle. The Operation document for the Harvest Tool provides the details for executing the software. A custom configuration file for the example bundle can be downloaded from http://pds.nasa.gov/repository/pds4/system/harvest/harvest-policy-example.xml. Depending on the location of the example bundle and the local environment, the $HOME variable in the configuration file may need to be replaced with the absolute path to the example bundle directory. Execute the Harvest Tool against the example bundle with the following commands:
% cd $HOME/harvest-0.4.0/bin
% ./Harvest ../../harvest-policy-example.xml
The above run will result in a few warnings due to a bug in Harvest with resolving the location of files associated with a Document product but the rest of the products should get registered successfully. The summary should look something like the following:
... Summary: 31 of 31 file(s) processed, 0 skipped 91 of 91 products registered. 89 of 89 associations registered, 0 skipped End of Log - View Registry Contents
The next step verifies that the registered content from the previous step can be viewed via the Registry Service REST-based API and the Registry User Interface. The Operation document for the Registry Service provides the details for interfacing with the service via the REST-based API. Assuming a default installation, the Registry Service should be accessible via the following URL: http://localhost:8080/registry/. Accessing the report endpoint (append report to the URL) from the desired web browser (some browsers display XML better than others), should produce the following output:
<ns2:report xmlns:ns2='http://registry.pds.nasa.gov' registryVersion='0.7.0'
packages='3' classificationNodes='67' classificationSchemes='1'
services='0' extrinsics='91' associations='337'
serverStarted='2011-09-26T15:57:51.978-07:00' status='OK'/>
The above report shows 91 extrinsics registered which corresponds with the Harvest summary. The number of associations registered is a little harder to verify because there were already some associations in the registry from the configuration step and at this time Harvest registers some additional associations which are not counted in the final summary. Feel free to try out some of the other endpoints (e.g. extrinsics) detailed in the Query Artifacts section of the Operations document.
Assuming a default installation, the Registry User Interface should be accessible via the following URL: http://localhost:8080/registry-ui/. Accessing this URL from the desired web browser, should produce the following display:
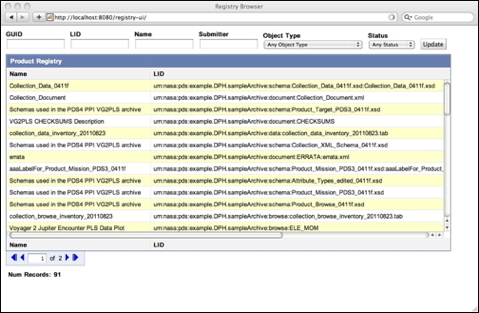
If viewing this document in online form, click the image for a larger version.If an "RPC Failure" message appears near the bottom of the screen, this is most likely the result of the Registry Service URL not being configured correctly. The Installation document for the Registry User Interface specifies how to modify the appropriate configuration file to correct this situation.

The above steps are not exhaustive by any measure with respect to testing the software, but they will verify that the software can be installed and executed in the various Node environments. Some Nodes are actively working on generating test PDS4 bundles and collections. If a Node would like to attempt to register those products with their local registry we would be glad to assist in this effort. Additionally, if any Nodes can easily make their Registry Service instance publicly available on the Internet, we at the EN would like to test our replication feature with a remote instance of the service. Please contact the EN development team if this is possible with the Node's local installation.
 |
|
 |
|