 |
|
|
 |
Documentation
Components
Project Documentation

Tomcat Deployment
Many of the components of the PDS system are packaged as Java-based web applications and require a Java Application Server to host them. Although there are a few free choices out on the market (e.g., Glassfish, Jetty, etc.) the EN development team consistently uses Apache Tomcat as its application server of choice. This document details the download, installation and configuration of an Apache Tomcat server for use in hosting PDS web applications.
Download
As of the writing of this document the current version of Tomcat is 7.0.21. New releases are made available periodically, with the latest version of 7.0.X available from the Apache Tomcat 7 Downloads page. The download page has several binary distributions to choose from:
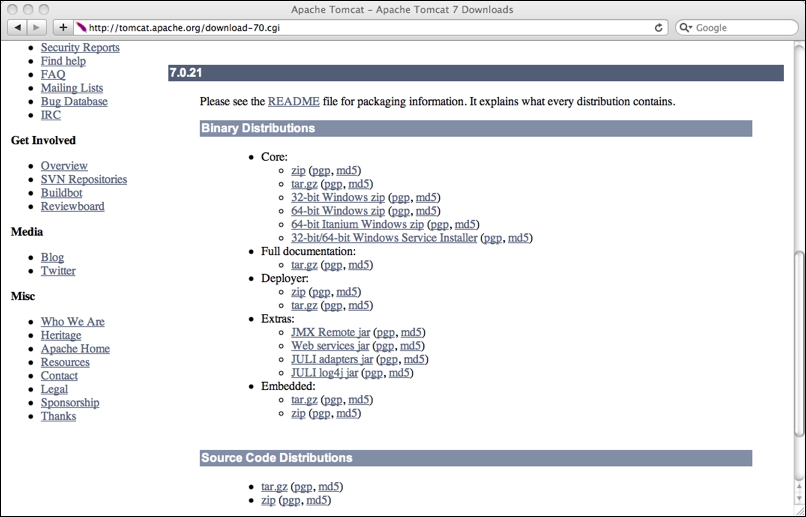
If viewing this document in online form, click the image for a larger version.
The first two listed under the Core bullet work nicely in UNIX-based environments. This deployment example assumes download and installation of the TAR/GZIP package. Select the link of the desired package to download the file to a local machine. In UNIX-based environments it is common to install additional machine-wide accessible software in the /usr/local directory. Depending on the machine, this may require root privileges. Copy the downloaded package file to this directory.
Install and Configure
Installation, at least in the UNIX environment, is as simple as unpacking the downloaded package. Execute the following commands to unpack the software and create a symbolic link to the resulting directory:
% cd /usr/local
% tar xzvf apache-tomcat-7.0.X.tar.gz
% ln -s apache-tomcat-7.0.X tomcat
The symbolic link will be useful when upgrading to future versions, minimizing the number path changes to be made in startup scripts. There are a number of configuration options that can be made to a Tomcat deployment but the software will pretty much run out of the box. Extensive documentation with respect to configuration options is available from the Apache Documentation 7 Documentation Index page. That said, there are a couple of common configuration changes like changing the port number that the server listens to and enabling access to the Manager interface that this document will cover.
By default, Tomcat comes configured to listen for requests on port 8080. This is actually a very common test port for various web server applications and may conflict with an existing application running in the local environment. To change the port number, execute the following commands to edit the server.xml configuration file (the example uses vi, but any editor will suffice):
% cd /usr/local/tomcat/conf
% vi server.xml
A search for 8080 should discover the following block of XML statements:
<Server port="8005" shutdown="SHUTDOWN">
  ...
    <Connector port="8080" protocol="HTTP/1.1"
               connectionTimeout="20000"
               redirectPort="8443" />
    <Connector executor="tomcatThreadPool"
               port="8080" protocol="HTTP/1.1"
               connectionTimeout="20000"
              redirectPort="8443" />
  ...
</Server>
In general, ports 1023 and below are commonly reserved by the system and require root user privileges to access. Ports 1024 through 49151 are sporadically used by applications registered with IANA. If the need is for another available port, than ports in the 9000 range are commonly available without conflict in most environments. The following three scenarios will help guide the port selection:
- To avoid a conflict with another application listening on port 8080, try changing the port to 8090, otherwise 9000 and above are usually unused.
- If running multiple Tomcat servers, than 8090 is still a good alternative but the shutdown and redirect ports also need to be modified so that they do not conflict with the other Tomcat server.
- If this Tomcat server is intended to respond to operational requests, then the port should be changed to 80 along with changing the redirect port to 443. The alternative to having Tomcat listen on port 80 is to have another web server (e.g., Apache HTTP Server, Microsoft IIS, etc.) listen on that port and have it redirect requests to the Tomcat server at port 8080. This type of configuration is covered in the Tomcat documentation and should also be covered in the documentation for the other web server.
Another common configuration change involves enabling the Manager interface. The Manager interface is not necessary to run Tomcat but it is nice for viewing status and deploying applications. In order to enable the interface, an account must be specified in the Tomcat users configuration file with the appropriate role. Execute the following commands to edit the tomcat-users.xml configuration file:
% cd /usr/local/tomcat/conf
% vi tomcat-users.xml
Add the two XML statements listed below within the <tomcat-users> block.
<tomcat-users>
  ...
  <role rolename="manager-gui"/>
  <user username="<username>" password="<password>" roles="manager-gui"/>
  ...
</tomcat-users>
The first statement defines the manager-gui role and the second statement defines a user with that role. Replace the <username> and <password> in the second statement with desired values for the local environment. This document discusses using the Manager interface in the Deploy Application section below.
Launch Tomcat
Launching the Tomcat server is relatively straight forward as long as the JAVA_HOME environment variable is set appropriately. Execute the following commands to launch the Tomcat server:
% cd /usr/local/tomcat/bin
% ./startup.sh
If launching the Tomcat server automatically upon system startup is desired, the Tomcat Setup portion of the Tomcat documentation provides details on setting this up. Alternatively, consult your system administrator for standard mechanisms of accomplishing this in the local environment. Another useful method for launching the Tomcat server is to create a separate script where specific environment variables can be set for use by Tomcat. The following is an example of such a script:
#!/bin/sh
export CATALINA_HOME=/usr/local/tomcat
export CATALINA_OPTS="-Dderby.system.home=/usr/local/derby"
export JAVA_HOME=/usr/local/java
$CATALINA_HOME/bin/startup.sh
The above script can be run from anywhere on the system because it defines the location of the Tomcat software and calls the same startup script that was demonstrated above. This script also defines a Java property and the Java home directory:
- CATALINA_OPTS
This environment variable allows the user to pass in application-specific Java properties to the applications that are deployed on the Tomcat server. In the example above, the location of the Derby database for the Registry Service is specified. This property is described in more detail in the Installation document for the Registry Service.
- JAVA_HOME
In most environments there will be one Java installation and this variable should reference the root directory of that installation. Because Tomcat 7 and the PDS software require Java 1.6, it may have been required to install this version of Java while version 1.5 was already installed in the local environment. By referencing the Java 1.6 installation with this variable in a separate startup script, it allows the rest of the local environment to utilize the Java 1.5 installation.
Once the Tomcat server has been launched by one of the methods above, the server should be accessible via the following URL: http://localhost:8080/. This assumes the listening port was not changed during the configuration. Accessing this URL from the desired web browser, should produce the following display:

If viewing this document in online form, click the image for a larger version.
Deploy Application
There are a few methods for deploying web applications (e.g., Registry Service, Registry User Interface, etc.) to the Tomcat server and two of them are discussed here. The first is to simply copy the WAR file from the software distribution package into the /usr/local/tomcat/webapps/ directory. The second is to access the Tomcat Manager interface from the Manager App button on the Welcome page displayed in the image above. The user is prompted to enter the username and password that was specified during the configuration. Upon successful authentication and authorization, the following page should be displayed:

If viewing this document in online form, click the image for a larger version.
Scrolling down towards the bottom of the page will expose the WAR file to deploy section of the page. From there, choose the WAR file from a local disk and then select the Deploy button to deploy the application to the Tomcat server.
For both methods of deployment, the application will be accessible from the base URL followed by a "/" and then the name of the WAR file minus the extension. So, the Registry Service would be accessible at the following URL: http://localhost:8080/registry/. This assumes the user followed the installation instructions for the Registry Service and renamed the WAR file to registry.war.
 |
|
 |
|