Software Documentation
- About Transport Service
- Installation
- Operation
Download
Project Documentation

This document describes how to install the Transport Service software contained in the transport-registry package. The following topics can be found in this section:
This section details the system requirements for installing and operating the Transport Service.
The Transport Service was developed using Java and will run on any platform with a supported Java Runtime Environment (JRE). The software was specifically compiled for Java version 1.7 and has been tested with this version and version 1.8. The following commands test the local Java installation in a UNIX-based environment:
% which java
/usr/bin/java

% java -version
java version "1.7.0_72"
Java(TM) SE Runtime Environment (build 1.7.0_72-b14)
Java HotSpot(TM) 64-Bit Server VM (build 24.72-b04, mixed mode)
The first command above checks whether the java executable is in the environment's path and the second command reports the version. If Java is not installed or the version is not at least 1.7, Java will need to be downloaded and installed in the current environment. Consult the local system administrator for installation of this software. For the do-it-yourself crowd, the Java software can be downloaded from the Oracle Java Download page. The suggested software package is the Java Standard Edition (SE) 7, either the JDK or the JRE package. The JDK package is not necessary to run the software but could be useful if development and compilation of Java software will also occur in the current environment.
The Transport Service requires a Java application server for hosting the web application. The suggested application server for this release is Apache Tomcat with a minimal version of 7.0.X. Consult the local system administrator for installation of this software. For the do-it-yourself crowd, see the Tomcat Deployment document for installation and configuration details. If viewing this document from the transport-registry package, view the Tomcat Deployment document from the Engineering Node site.
The top-level directory where Apache Tomcat is installed (i.e. the directory containing the webapps and conf sub-directories) will be referenced in these instructions as $TOMCAT_HOME.
Download the transport-registry package from the PDS FTP site. The binary distribution is available in identical zip or tar/gzip packages. The installation directory may vary from environment to environment but in UNIX-based environments it is typical to install software packages in the /usr/local directory and in Windows-based environments it is typical to install software packages in the C:\Program Files directory. Unpack the selected binary distribution file with one of the following commands:
% unzip transport-registry-1.4.0-bin.zip
or
% tar -xzvf transport-registry-1.4.0-bin.tar.gz
Note: Depending on the platform, the native version of tar may produce an error when attempting to unpack the distribution file because many of the file paths are greater than 100 characters. If available, the GNU version of tar will resolve this problem. If that is not available or cannot be installed, the zipped package will work just fine in a UNIX environment.
The commands above will result in the creation of the transport-registry-1.4.0 directory with the following directory structure:
A README file directing the user to the available documentation for the project.
The copyright notice from the California Institute of Technology detailing the restrictions regarding the use and distribution of this software. Although the license is strictly worded, the software has been classified as Technology and Software Publicly Available (TSPA) and is available for anyone to download and use.
This is the Web ARchive (WAR) file containing the Transport Service software including all dependent JAR files.
This directory contains a local web site with the Transport Service documentation, javadoc, unit test results and other configuration management related information. Just point the desired web browser to the index.html file in this directory.
The Transport Service web application is packaged as a WAR file and is intended for installation under a standard Java Application Server. For a Tomcat server deployment, the WAR file is normally copied directly to the webapps directory within the Tomcat installation or installed via the Manager interface. Once this step is complete, the application is ready for configuration.
The preferred method for configuring the Transport Service is to use the web-based interface. There is also a method for file-based configuration, which is especially useful when performing an upgrade of the service. The service comes configured for accessing a local Registry Service and a local Search Service. It is suggested that the final configuration only access one type of service, either registry or search.
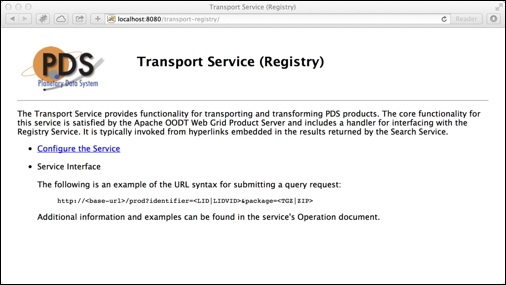
The Transport Service is a web application and can be accessed with any standard web browser (e.g., Firefox, Safari, Internet Explorer, etc.). Assuming the user is attempting access to the application from the local machine where the application server is running, the application is accessible from the following end point: http://localhost:8080/transport-registry. The following screen should appear in your web browser:
Select the Configure the Service link, which will display the following login screen:
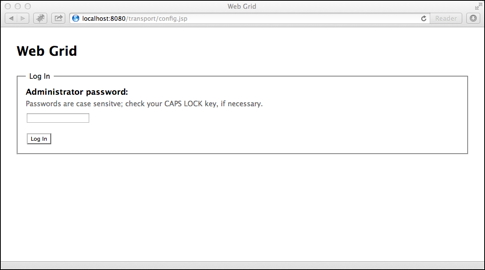
Enter the default password of hanalei and select the Log In button to display the following configuration screen:
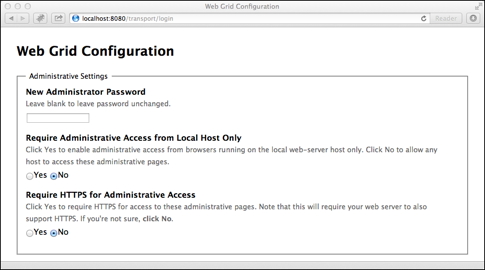
The top portion of the screen provides access to the following configuration settings:
Change the default administrator password. Enter a new password in the text box. This password will be required to reconfigure the Transport Service in the future.
Select the Yes button if administrative access should be limited to web browsers running on the host machine where the application server is running. Selecting the No button, will allow access to all hosts.
Select the Yes button to require HTTPS for administrative access. The host application server must support HTTPS. Selecting the No button, will provide access over HTTP.
Scroll down the screen to the System Properties section as displayed below:
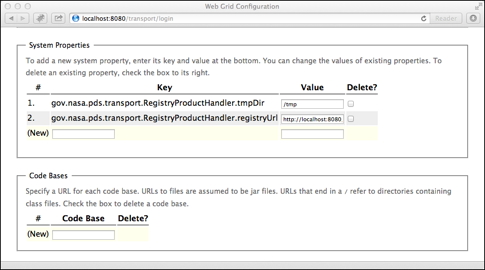
The System Properties section lists the properties for both the Registry and Search product handlers. Depending the desired handler, the properties for the other handler should be deleted. This can be accomplished by selecting the Delete check box next to the property to be deleted and then selecting the Save Changes button at the bottom of the page. If configuring the Registry product handler, the following two properties must be specified:
This property must contain the end point for the Registry Service to be queried by the Transport Service. The default value for this property is http://localhost:8080/registry. Optionally, the value can be set to a comma-separated list of Registry URLs, which will be queried in sequence by the Transport Service until a match is found, and the corresponding product is returned. For example:
http://localhost:8080/registry-pds3, http://localhost:8080/registry-pds4.
This property must contain the full path to a local directory that will be used as scratch space for the Transport Service. The default value for this property is /tmp.
If configuring the Search product handler, the following three properties must be specified:
This property must contain the end point for the Registry Service to be queried by the Transport Service. The default value for this property is http://localhost:8080/search-service.
This property must contain either true or false indicating whether the Transport Service uses the file_ref_url field or the file_ref_path and file_ref_name fields from the Search Service for accessing a target file. The default value for this property is false.
This property must contain the full path to a local directory that will be used as scratch space for the Transport Service. The default value for this property is /tmp.
The Transport Service does offer some more advanced configuration settings including adding code bases and additional product or profile query handlers. These advanced configuration settings will not be covered here. Scroll down to the bottom of the screen as displayed below:
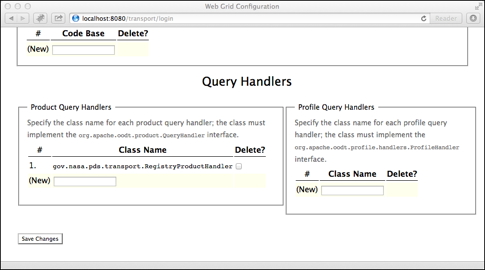
In the Product Query Handlers section, delete the handler that is not being configured for this instance of the Transport Service. This can be accomplished by selecting the Delete check box next to the handler to be deleted and then selecting the Save Changes button at the bottom of the page. The Transport Service is now ready for operations.
Although not the suggested method for configuring the Transport Service, this method can be useful if the desire is to transfer the configuration from one Transport Service to another (i.e., upgrading versions). The configuration file resides at $TOMCAT_HOME/webapps/transport-registry/WEB-INF/config.xml and should look something like the following for a Registry product handler configuration:
<configuration xmlns='http://osr.jpl.nasa.gov/web-grid/ns/'
  https='false' localhost='false' password='aGFuYWxlaQ=='>
  <server className='gov.nasa.pds.transport.RegistryProductHandler' type='product'/>
  <properties>
    <property key='gov.nasa.pds.transport.RegistryProductHandler.registryUrl'>
      http://localhost:8080/registry
    </property>
    <property key='gov.nasa.pds.transport.RegistryProductHandler.tmpDir'>
      /tmp
    </property>
  </properties>
</configuration>
It should look something like the following for a Search product handler configuration:
<configuration xmlns="http://osr.jpl.nasa.gov/web-grid/ns/"
  https="false" localhost="false" password="aGFuYWxlaQ==">
  <server className="gov.nasa.pds.transport.SearchProductHandler" type="product"/>
  <properties>
    <property key="gov.nasa.pds.transport.SearchProductHandler.searchUrl">
      http://localhost:8080/search-service
    </property>
    <property key="gov.nasa.pds.transport.SearchProductHandler.useFileRefUrl">
      false
    </property>
    <property key="gov.nasa.pds.transport.SearchProductHandler.tmpDir">
      /tmp
    </property>
  </properties>
</configuration>
Note: For readability purposes, the <property> elements in the example above have been broken up into multiple lines. Each of these lines should be represented as a single line (with no line breaks) in the actual configuration file.
Before upgrading the Transport Service, make a copy of the above configuration file. Install the new Transport Service as specified above. Shutdown the host application server, copy the saved configuration file over the one that came in the new installation and they restart the application server. The Transport Service is now ready for operations.