 |
|
|
 |
Installation
This document describes how to install the OpenDS software package. This package serve as the Security Service for the PDS 2010 system. The following topics can be found in this section:
System Requirements
The software that makes up this project consists of the OpenDS open source package that is available for download and installation. This release requires version 2.2.0 of OpenDS. This package requires Java and a Java Application Server to be installed in the target environment.
Java Runtime Environment
The OpenDS product was developed using Java and will run on any platform with a supported Java Runtime Environment (JRE). The software requires Java version 1.6. The following commands test the local Java installation in a UNIX-based environment:
% which java
/usr/bin/java

% java -version
java version "1.6.0_26"
Java(TM) SE Runtime Environment (build 1.6.0_26-b03-384-10M3425)
Java HotSpot(TM) 64-Bit Server VM (build 20.1-b02-384, mixed mode)
The first command above checks whether the java executable is in the environment's path and the second command reports the version. If Java is not installed or the version is not at least 1.6, Java will need to be downloaded and installed in the current environment. Consult the local system administrator for installation of this software. For the do-it-yourself crowd, the Java software can be downloaded from the Oracle Java Download page. The software package of choice is the Java Standard Edition (SE) 6, either the JDK or the JRE package. The JDK package is not necessary to run the software but could be useful if development and compilation of Java software will also occur in the current environment.
Java Application Server
OpenDS requires a Java application server for hosting the web application. The suggested application server for this release is Apache Tomcat with a minimal version of 6.0.20 through version 7.0.X. Consult the local system administrator for installation of this software. For the do-it-yourself crowd, the Apache Tomcat software can be downloaded from the Apache Tomcat page. Choose the version to download (6.0 or 7.0) from the menu on the left.
Software Installation
1. Install Directory Server
We are choosing to install a directory server (OpenDS), within the application server so that it is accessible from other applications that require a standard LDAP interface.
- Download the package from http://www.opends.org/promoted-builds/2.2.0/. There are a couple of options to choose from including the QuickSetup Installer or just downloading the ZIP package.
- Install the package so that it operates on the standard LDAP port 389. The ZIP package provides installation documentation. Additional documentation is available at https://docs.opends.org/2.2/page/InstallingTheDs.
- Startup the server.
Install OpenDS with QuickSetup
Launch QuickSetup Locally.
% $OPENDS_HOME/setup
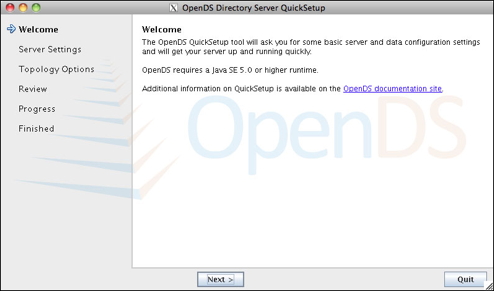
- Click Next to install a server.
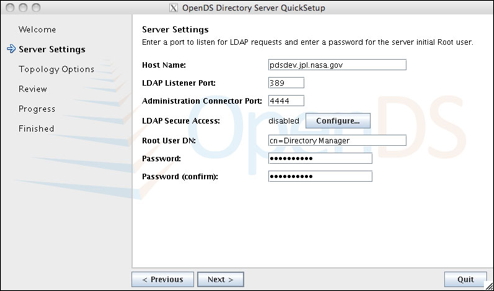
Click on the image for a larger version. - Enter a valid port for LDAP operations. If you run QuickSetup as the root user, port 389 is used as default LDAP port. If you run QuickSetup as a non-root user, port 1389 is used as the default port.
- LDAP secure access is disabled by default. If you require secure access, follow the instructions under Configure the LDAP server with SSL using a self-signed certificate.
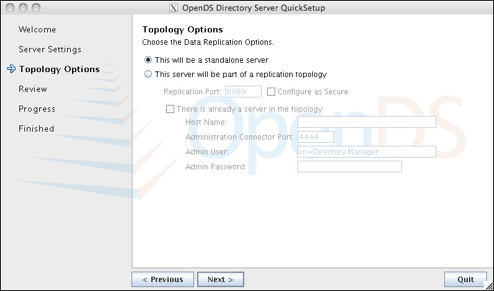
Click on the image for a larger version. - Select This will be a standalone server and click Next.
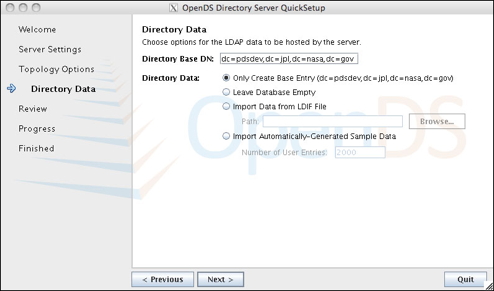
Click on the image for a larger version. - Enter Directory Base DN: (example: dc=pdsops,dc=jpl,dc=nasa,dc=gov) and click Next.
Click on the image for a larger version. - This panel enables you to review your configuration settings and make any necessary adjustments.
- Click Finish to complete the configuration after verifying your configuration settings.
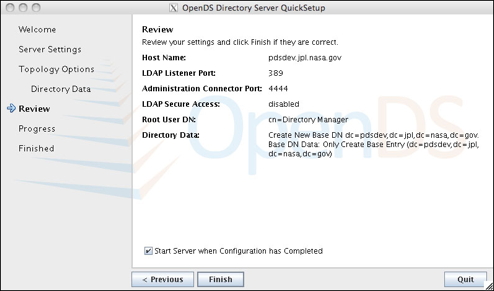
Click on the image for a larger version. - When the installation is complete, a status message is displayed indicating success or failure.
- To view the status of the server, click the Launch Control Panel button.
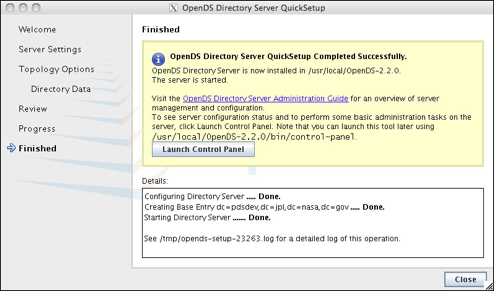
Click on the image for a larger version.
Configure the LDAP server with SSL using a self-signed certificate
Assume that you are running following commands under $OPENDS_HOME/config directory.
- Create a private key for the certificate
% /usr/java/jdk/bin/keytool -genkey -alias server-cert -keyalg rsa \ -dname "CN=pdsops.jpl.nasa.gov,O=JPL,C=US" -keystore keystore -storetype JKS - Generate a self-signed certificate for the key with the command:
% /usr/java/jdk/bin/keytool -selfcert -alias server-cert -validity 1825 \
-keystore keystore -storetype JKS
When you are prompted for the keystore password, enter the same password that you provided in Step 1.
- Create a text file named keystore.pin.
The file should contain the password that you chose to protect the contents of the keystore.
- Export the public key for the certificate.
% /usr/java/jdk/bin/keytool -export -alias server-cert -file server-cert.txt -rfc \ -keystore keystore -storetype JKS - Create a new trust store and import the server certificate into it.
% /usr/java/jdk/bin/keytool -import -alias server-cert -file server-cert.txt \
-keystore truststore -storetype JKS
Type yes when you are prompted about whether you want to trust the certificate.
- Use the dsconfig command to enable the key manager provider, trust manager provider, and connection handler.
% $OPENDS_HOME/bin/dsconfig -h pdsops.jpl.nasa.gov -p 4444 \
-D "cn=Directory Manager" -w password -X -n set-key-manager-provider-prop \
--provider-name JKS --set enabled:true

% $OPENDS_HOME/bin/dsconfig -h pdsops.jpl.nasa.gov -p 4444 \
-D "cn=Directory Manager" -w password -X -n set-trust-manager-provider-prop \
--provider-name "Blind Trust" --set enabled:true

% $OPENDS_HOME/bin/dsconfig -h pdsops.jpl.nasa.gov -p 4444 \
-D "cn=Directory Manager" -w password -X -n set-connection-handler-prop \
--handler-name "LDAPS Connection Handler" \
--set "trust-manager-provider:Blind Trust" --set key-manager-provider:JKS \
--set listen-port:636 --set enabled:true
Port 636 is the standard LDAPS port, but you might not be able to use it if it is already taken or you are a regular user. If you need to use other port than 636, then change the listen-port property in the last command to the number being used.
- Test the LDAPS connection with the ldapsearch command.
% $OPENDS_HOME/bin/ldapsearch --port 636 --useSSL --baseDN "" \
--searchScope base "(objectClass=*)"
Type yes when you are prompted about whether you want to trust the server's certificate.
2. Install Application Server
Although other application servers are supported (e.g., GlassFish), Apache Tomcat is the preferred application server.
- Download the appropriate binary package for your platform from http://tomcat.apache.org/download-60.cgi.
- Install the package so that it operates on port 80. Documentation can be found in the binary distributions and at http://tomcat.apache.org/tomcat-6.0-doc/.
Modify the $CATALINA_HOME/bin/catalina.sh file as follows:
CATALINA_OPTS="-Xms256m -Xmx1024m" JAVA_OPTS="-Xmx1024m -XX:MaxPermSize=256m" - Startup the server.
Configuration
This section details the Directory Sever, the Tomcat Server, and the Tomcat Application configuration.
Directory Server Configuration
With the software configuration complete, it is time to add groups and users to the directory server. The following configuration files, in the LDAP Data Interchange Format (LDIF), are available for configuring the directory server:
- pdspers_schema.ldif
This configuration file specifies the schema for the directory server. - pds_groups.ldif
This configuration file specifies the PDS group entries for the directory server. - pdsops_pers.ldif
This configuration file specifies PDS person entries for the directory server. The actual PDS person entries have been removed from this example configuration file since it contains clear text passwords. This file contains an example person entry for the pdsmc account.
Execute the commands with the configuration files as follows:
% $OPEN_DS/bin/ldapmodify -p 389 -h pdsops.jpl.nasa.gov -D "cn=Directory Manager" \
-w <password> -c -a -f pdspers_schema.ldif

% $OPEN_DS/bin/ldapmodify -p 389 -h pdsops.jpl.nasa.gov -D "cn=Directory Manager" \
-w <password> -c -a -f pds_groups.ldif

% $OPEN_DS/bin/ldapmodify -p 389 -h pdsops.jpl.nasa.gov -D "cn=Directory Manager" \
-w <password> -c -a -f pdsops_pers.ldif
Tomcat Server Configuration
Type following command to generate a self-signed server certificate:
% $JAVA_HOME/bin/keytool -genkey -alias virtualhostname -keyalg RSA \
-keystore /usr/local/tomcat7/.keystore
The password you enter in the first password prompt will be the password for the keystore where your server certificate is stored. For the operational system, you may need to purchase a Certificate from a well-known Certificate Authority(CA) such as VeriSign or Thawte.
After generating the server certificate, edit the Tomcat's server configuration file ($CATALINA_HOME/conf/server.xml) to have Tomcat server listening on the port 8080. The redirectPort option is the port that will be used when redirecting from http to https.
<Connector port="8080" protocol="HTTP/1.1"
           connectionTimeout="20000"
           redirectPort="8443" />
To make Tomcat listen on the port 8443, with an SSL transport, the following needs to be configured in the server.xml file.
<Connector port="8443" protocol="HTTP/1.1" SSLEnabled="true"
          maxThreads="150" scheme="https" secure="true"
          clientAuth="false" sslProtocol="TLS"
          keystoreFile="/usr/local/tomcat7/.keystore"
          keystorePass="password"/>
Add an OpenDS realm to the Tomcat Server to authenticate the users with the Directory Server.
<Realm className="org.apache.catalina.realm.JNDIRealm" debug="99"
        connectionName="cn=Directory Manager"
        connectionPassword="password"
        connectionURL="ldap://pdsdev.jpl.nasa.gov:389"
        userPattern="uid={0},ou=people,dc=pdsdev,dc=jpl,dc=nasa,dc=gov"
        roleBase="ou=groups,dc=pdsdev,dc=jpl,dc=nasa,dc=gov"
        roleName="cn"
        roleSearch="(uniqueMember={0})"/>
To enable Single Sign On feature of the Tomcat server, make sure following element is not commented out.
<Valve class="org.apache.catalina.authenticator.SingleSignOn"/>
Tomcat Application Server Configuration
Add the security-constraint, role, and login-config elements to your application's web.xml file as shown below.
<security-constraint>
  <web-resource-collection>
    <web-resource-name>registry</web-resource-name>
    <url-pattern>/*</url-pattern>
    <http-method>DELETE</http-method>
    <http-method>POST</http-method>
    <http-method>PUT</http-method>
  </web-resource-collection>
  <auth-constraint>
    <role-name>PDS_Affiliate</role-name>
  </auth-constraint>
</security-constraint>

<login-config>
   <auth-method>BASIC</auth-method>
   <realm-name>OpenDS</realm-name>
</login-config>
Add the following in the your application's web.xml ($CATALINA_HOME/webapps/yourapplication/WEB-INF/web.xml) in the <security-constraint> tag:
<user-data-constraint>
   <transport-guarantee>CONFIDENTIAL</transport-guarantee>
</user-data-constraint>
This forces a switch from http to https, using the secure protocol. With this configuration, you can create a Tomcat application that will automatically be secured if accessing it at:
http://localhost:8080/registry/extrinsics
You will be automatically redirected to:
https://localhost:8443/registry/extrinsics
 |
|
 |
|
