 |
|
|
 |
Installation
This section describes how to install the OpenAM software package and its associated software packages. These packages serve as the Security Service for the PDS 2010 system. The following topics can be found in this section:
Note that much of the documentation and examples for OpenAM still make reference to OpenSSO (the former name of the package under Sun Microsystems).
System Requirements
The software that makes up this project consists of open source packages that are available for download and installation. The packages and their release versions are as follows:
- OpenAM Release 9
- OpenDS 2.2.0
- J2EE Policy Agent 3.0 for Apache Tomcat
The above software packages require the following software to be installed in the target environment:
- Sun Java Standard Edition (J2SE) 1.6.X
- Apache Tomcat 6.0.20
Software Installation
The standard installation of the Security Service involves at least two machines. The first machine hosts the OpenAM and OpenDS software. The second machine hosts a service that requires access control (e.g., Registry Service). This machine is where the J2EE Policy Agent will be installed and configured. Perform steps 1 through 3 on the first machine and steps 4 and 5 on the second machine. Once the installation of the software is complete, follow the instructions in the Configuration section to configure the software.
1. Install Directory Server
Although the installation of OpenAM includes an installation of a directory server (OpenDS, within the application server), we are choosing to install one separately so that it is accessible from other applications that require a standard LDAP interface.
- Download the package from http://www.opends.org/promoted-builds/2.2.0/. There are a couple of options to choose from including the QuickSetup Installer or just downloading the ZIP package.
- Install the package so that it operates on the standard LDAP port 389. The ZIP package provides installation documentation. Additional documentation is available at https://docs.opends.org/2.2/page/InstallingTheDs.
- Startup the server.
2. Install Application Server
Although other application servers are supported (e.g., GlassFish), Apache Tomcat is the preferred application server.
- Download the appropriate binary package for your platform from http://tomcat.apache.org/download-60.cgi.
- Install the package so that it operates on port 80. Documentation can be found in the binary distributions and at http://tomcat.apache.org/tomcat-6.0-doc/.
Modify the $CATALINA_HOME/bin/catalina.sh file as follows:
CATALINA_OPTS="-Xms256m -Xmx1024m" JAVA_OPTS="-Xmx1024m -XX:MaxPermSize=256m" - Startup the server.
3. Install OpenAM
The OpenAM software is packaged as a Web Archive (WAR) file and ready for deployment to an application server.
- Download the package from http://forgerock.com/downloads.html.
- Deploy the downloaded WAR file to the application server. The application should be accessible from /openam.
4. Install Service Requiring Access Control
On the second machine, either install or verify installation of the service (e.g., Registry Service) requiring access control on that machine's application server.
5. Install J2EE Policy Agent
The J2EE Policy Agent software is specific to the application server where it will be installed.
- Shutdown the application server.
- Download the J2EE Policy Agent for your application server from http://forgerock.com/downloads.html.
- Install the J2EE Policy Agent. Documentation (specific to Apache Tomcat 6.0.X) can be found at http://dlc.sun.com/pdf/820-7251/820-7251.pdf. See the Policy Agent Installation section for an example installation. If viewing this document in PDF form, see the appendix for details.
- Startup the application server.
Configuration
This section details the software and policy configuration of the OpenAM and the J2EE Policy Agent software.
Software Configuration
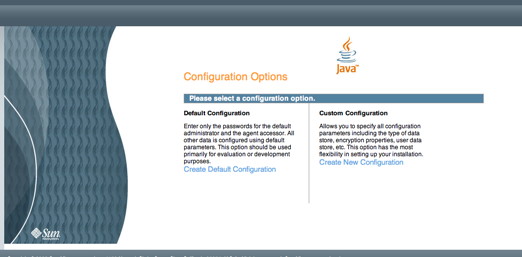
Start the configuration by opening your favorite browser (e.g., Firefox, Safari, etc.) and go to the following URL (http://[host[:port]]/openam/), where the host and port (if other than port 80) values correspond with the application server installation from step 2 above. You should see the following screen in your browser window:
If viewing this document in online form, click the image for a larger version.
Select the Create New Configuration link on the screen above. You should see the following screen in your browser window:
If viewing this document in online form, click the image for a larger version.
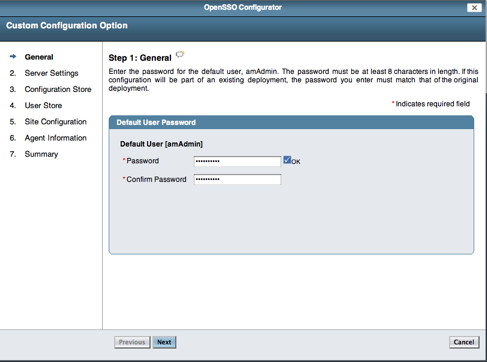
Enter a new password for the amAdmin account and then select the Next button. You should see the following screen in your browser window:
If viewing this document in online form, click the image for a larger version.
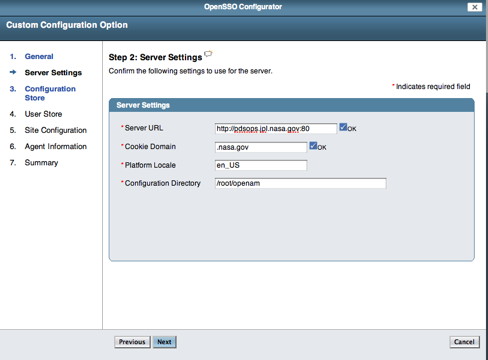
Enter the Server URL and Cookie Domain (e.g., nasa.gov) then select the Next button. You should see the following screen in your browser window:
If viewing this document in online form, click the image for a larger version.
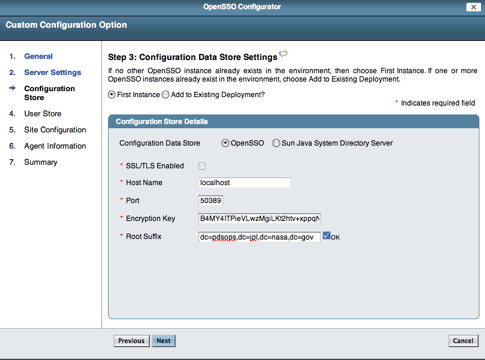
Modify the Root Suffix with the information from the OpenDS installation (e.g., dc=pdsops,dc=jpl,dc=nasa,dc=gov) then select the Next button. You should see the following screen in your browser window:
If viewing this document in online form, click the image for a larger version.
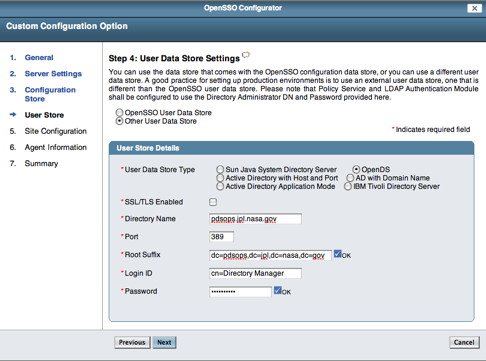
Select the OpenDS radio button, enter the Directory Name (e.g., pdsops.jpl.nasa.gov), Port (389), Root Suffix (e.g., dc=pdsops,dc=jpl,dc=nasa,dc=gov), Login ID (cn=Directory Manager) and Password for the OpenDS installation then select the Next button. You should see the following screen in your browser window:
If viewing this document in online form, click the image for a larger version.
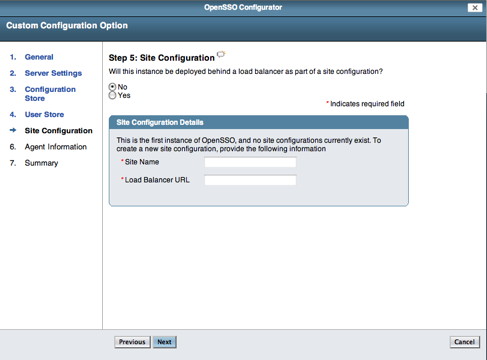
Select the No radio button then select the Next button. You should see the following screen in your browser window:
If viewing this document in online form, click the image for a larger version.
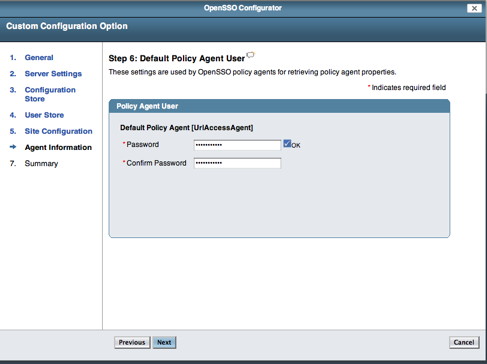
Enter a new Password for the Policy Agent then select the Next button. You should see the following screen in your browser window:
If viewing this document in online form, click the image for a larger version.
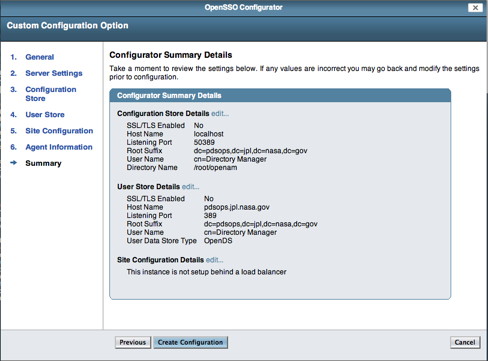
Assuming the information is correct, select the Create Configuration button. If no error messages are displayed you should see the following screen in your browser window indicating successful completion:
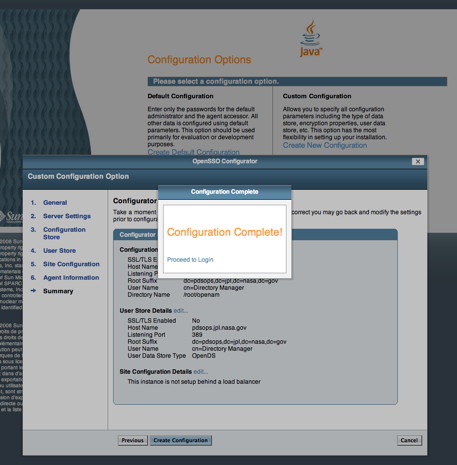
If viewing this document in online form, click the image for a larger version.
Directory Server Configuration
With the software configuration is complete it is time to add groups and users to the directory server. Execute the commands as follows.
- % $OPEN_DS/bin/ldapmodify -p 389 -h pdsops.jpl.nasa.gov -D "cn=Directory Manager" -w <password> -c -a -f pdspers_schema.ldif
- % $OPEN_DS/bin/ldapmodify -p 389 -h pdsops.jpl.nasa.gov -D "cn=Directory Manager" -w <password> -c -a -f pds_groups.ldif
- % $OPEN_DS/bin/ldapmodify -p 389 -h pdsops.jpl.nasa.gov -D "cn=Directory Manager" -w <password> -c -a -f pdsops_pers.ldif
Policy Configuration
With the software configuration and the directory server configuration complete it is now time to configure the policy. Select the Proceed to Login link from the screen above. You should see the following screen in your browser window:
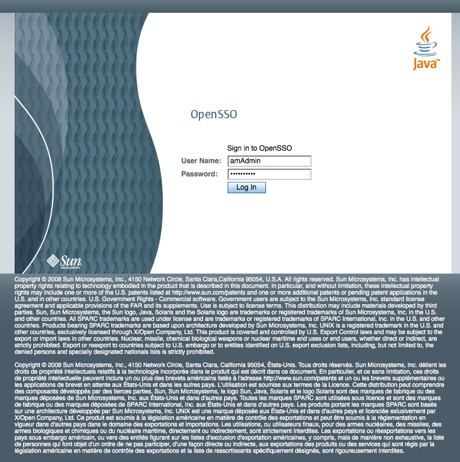
If viewing this document in online form, click the image for a larger version.
Enter the User Name (amAdmin) and Password then select the Login button.
Create a User
Perform the following steps to create a user:
- Select the Access Control tab.
- Select /(Top Level Realm).
- Select the Subjects tab.
- Select the New button from the User section.
You should see the following screen in your browser window:
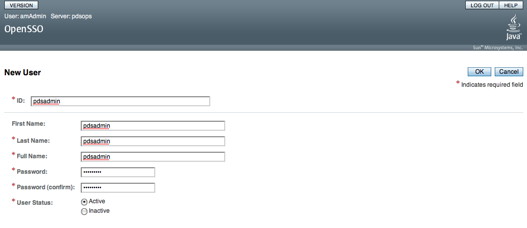
If viewing this document in online form, click the image for a larger version.
Enter the information for a test user (e.g., pdsadmin) then select the OK button.
Create a Policy
Perform the following steps to create a policy:
- Select the Access Control tab.
- Select /(Top Level Realm).
- Select the Policies tab.
- Select the New Policy button.
- Enter a name (e.g., registry_policy).
- Select the New button from the Rules section.
You should see the following screen in your browser window:
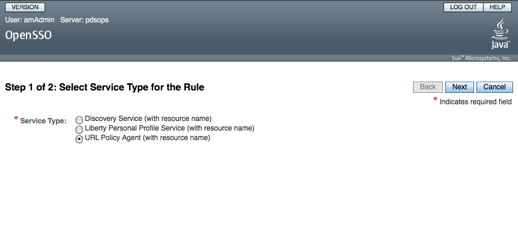
If viewing this document in online form, click the image for a larger version.
Continue with the following steps to create a policy:
- Select the URL Policy Agent (with resource name) radio button.
- Select the Next button.
You should see the following screen for entering a rule in your browser window:
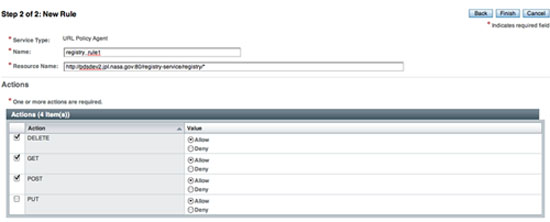
If viewing this document in online form, click the image for a larger version.
- Enter a Name (e.g., registry_rule1).
- Enter a Resource Name (e.g., http://pdsops2.jpl.nasa.gov:80/registry-service/registry/*).
- Select the DELETE, GET and POST check boxes.
- Select the Finish button.
Enter a second rule as detailed in the following screen:
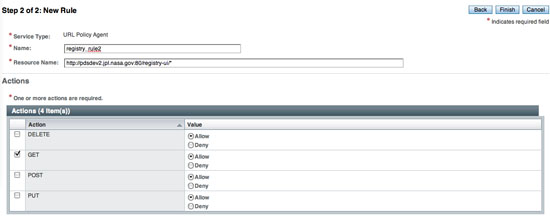
If viewing this document in online form, click the image for a larger version.
- Enter a Name (e.g., registry_rule2).
- Enter a Resource Name (e.g., http://pdsops2.jpl.nasa.gov:80/registry-ui/*).
- Select the GET check box.
- Select the Finish button.
Once the rules are defined, the subject must be defined. Select the New button from the Subjects section. You should see the following screen in your browser window:

If viewing this document in online form, click the image for a larger version.
- Select the OpenSSO Identity Subject radio button.
- Select the Next button.
You should see the following screen in your browser window:
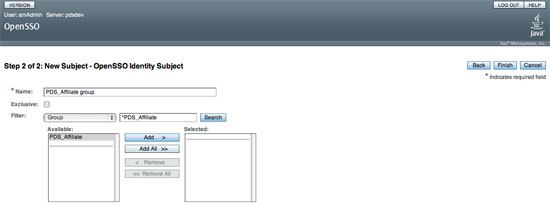
If viewing this document in online form, click the image for a larger version.
- Enter a Name (e.g., PDS_Affiliate group).
- Choose Group from the Filter list.
- Enter a group name to search on the * text box (e.g., *PDS_Affiliate).
- Select the Search button. Then, you will see the group name in the Available list box.
- Select the group name from the Available list box.
- Select the Add > button.
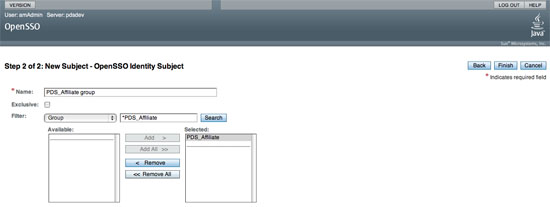
If viewing this document in online form, click the image for a larger version.
- Select the Finish button.
- Select the Save button on the subsequent screen.
You should see the following screen in your browser window:
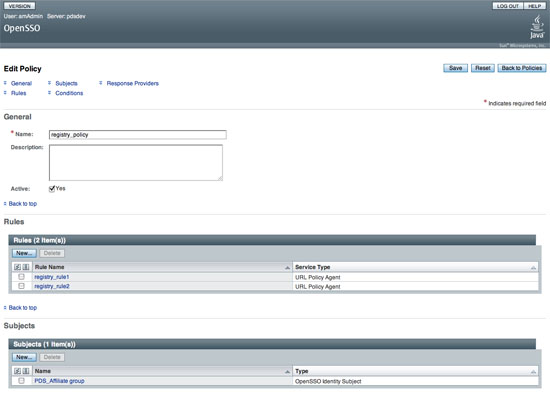
If viewing this document in online form, click the image for a larger version.
Select the OK button and you should see the following screen in your browser window:
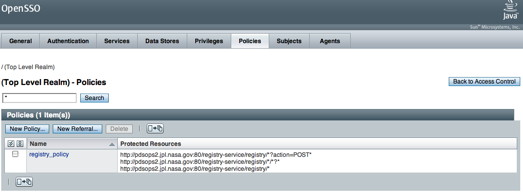
If viewing this document in online form, click the image for a larger version.
Configure a Policy Agent
Perform the following steps to configure a policy agent:
- Select the Access Control tab.
- Select /(Top Level Realm) realm.
- Select the Agent tab.
- Select the J2EE tab.
- Select New on the Agent section.
You should see the following screen in your browser window:
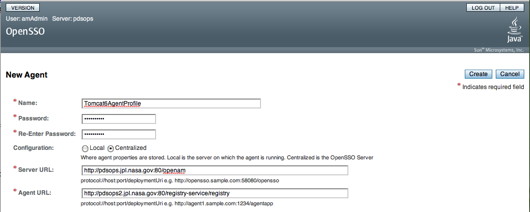
If viewing this document in online form, click the image for a larger version.
- Enter a Name (same as a profile name when you install a policy agent e.g., Tomcat6AgentProfile).
- Enter a new Password (same password that is in $HOME/tomcat6agentpw when you install a policy agent)
- Enter a Server URL (e.g., http://pdsops.jpl.nasa.gov:80/openam). Note that the port number should be specified, otherwise it is defaulted to port 80.
- Enter the Agent URL with the target service URL (e.g., http://pdsops2.jpl.nasa.gov:80/registry-service/registry).
- Select the Create button.
You should see the following screen in your browser window:
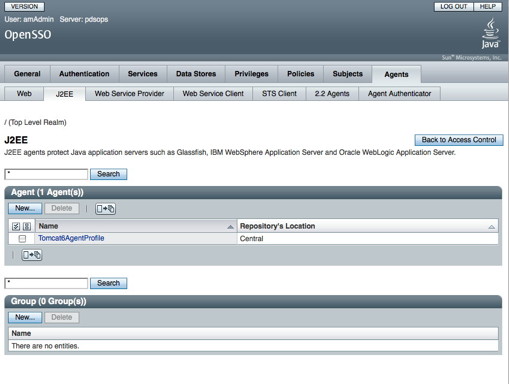
If viewing this document in online form, click the image for a larger version.
Configure Not Enforced URI Processing
Perform the following steps to configure "Not Enforced URI Processing":
- Select the Access Control tab.
- Select /(Top Level Realm) realm.
- Select the Agent tab.
- Select the J2EE tab.
- Select the Tomcat6AgentProfile link.
- Select the Application tab.
- Select the Not Enforced URI Processing link.
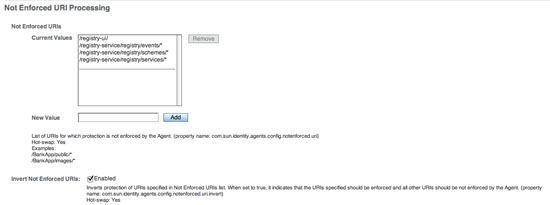
You should see the following screen in your browser window:
If viewing this document in online form, click the image for a larger version.
Enter each of the following values in the New Value text box and select the Add button:
- /registry-ui/
- /registry-service/registry/events/*
- /registry-service/registry/schmes/*
- /registry-service/registry/services/*
Select the Enabled check box from the Invert Not Enfored URIs.
 |
|
 |
|
